68kMLA Classic Interface
This is a version of the 68kMLA forums for viewing on your favorite old mac. Visitors on modern platforms may prefer the main site.
| Click here to select a new forum. | |
| Power Mono Classic Build | |
| Posted by: toledogeek on 2017-07-12 04:16:28 a couple days ago It dawned on me that i don't think I've ever seen someone build a Monochrome AND PowerPC mac classic. there are plenty of threads around dealing with color classics, which, honestly, don't look all that great at 640x480. Parts used in the build: Mac Classic - completely gutted and retrobrighted. Performa 62xx - Motherboard, edge connector and auxiliary boards, pretty much everything except case, psu, and CDROM/HDD. 80W industrial power supply - you need +5, +12, -12. the Mobo draws about 5A on the 5V at a full load, so something that can handle that, 12V supplies just need to "be there" I used one that was handy, but meanwell make some that are pretty much the same. 9" SVGA Monochrome monitor - this one was branded "miracle" . i was lazy and didn't build a VGA cable, i just used the video out board and a mac multisync monitor adapter. some random heatsink for the CPU - the one thats included is a joke, root around and find something else. so lets start! i decided to start the build with the monitor and electronics, the tube bolts right up, the monitors board was on pretty short leads, and i didn't feel like extending them, so i used a plastic tub that got cut up to act as a "shelf" the plastic shelf is screwed to the front panel 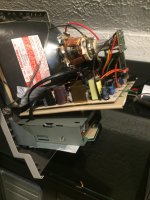 you'll need to cut down the classics cage to a bare minimum to support the floppy, and lengthen (widen?) the mount holes so you can use the manual inject drive without toothpick fingers. Aux boards and speaker get tucked under the CRT board. there is just enough space to mount a CF to IDE adapter under the floppy. make sure that its isolated as well. 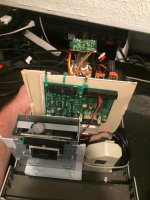 so that about covers that half. pretty simple so far. next up, the motherboard. get out your dremel or hot knife.. time for smelly messy fun. cut out the "port cover" area of the classics shell, leave yourself a little room on the top and sides of the recess, so you'll have something to glue to. you'll also need to cut or melt in a slot on both sides of the port area about 3mm into the plastic to support the motherboard in the rear, test fit it, and you'll see what i mean. these grooves are needed for clearance in the front, and to get the performas port cover to fit properly. 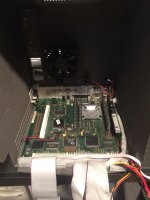 as you can see it barely fits. 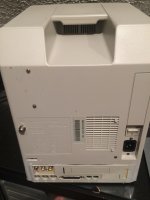 next up is the PSU the only place left for the power supply is the upper right corner. everyplace else is taken, there is not much room left once assembled, and you don't want anything near the CRT neck. 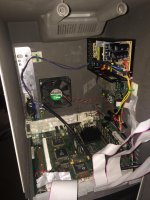 wire up power to your edge connector, and please note that the -12 is on the little grey connector that went to your old PSU, pin 1. you'll need the -12 if you want sound. if using a CF to IDE adapter, you'll be pleased to know that you don't need to wire power for it, it'll grab it off the IDE bus. wire up your fan, of course. in order to keep it "modular" i ran a short IDC cable from the switch, so i can connect/disconnect the monitor. i did reuse the switch and back metal from the classics analog board. i actually wanted the tuner, so that got mounted up as well. "I Love Lucy" looks great. the nice side affect of this approach is you have 2 distinct halves that can be separated out for service/hacking/etc. got all that? good. now it can be assembled. lay the front panel face down in front of the back case, everything should JUUUUST reach and plug right in. put the front panel on top right corner first. work clockwise... it'll be tight. i put 2 small screws in the bottom of the case to hold the front. 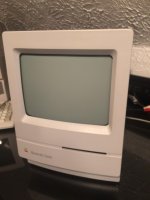 hey, it all fits! 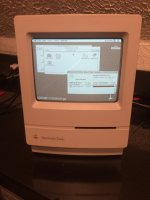 if you did it right, you'll be greeted with that funky startup chime about 2 seconds after flipping the switch on the rear. you'll likely need to fiddle with screen geometry to get it right. things to do: relocate CRT adjustment pots to back panel, under access door, of course i'd have to make it so they unplug. find a small fan for the CPU. it runs hotter than i'd like. clean up the back port area. waiting on the ethernet card to arrive. so, that was a fun little escape from the SE/30s and color classics I've been working on. both mac classics and Power Mac 62xx's are not really worth anything. so i feel as though i didn't ruin anything in the process. and now i have a 9"mac that can play doom pretty well, so then theres that. also.... does anyone need a just-recapped mac classic motherboard w/4MB ram and a FPD card? | |
| Posted by: 360alaska on 2017-07-12 04:22:25 I've thought about do this but with a ipad lcd and also in a plus, the 630/580 logic board even slides on the rails. Good Job! | |
| Posted by: ScutBoy on 2017-07-12 06:12:23 Nice! | |
| Posted by: bigmessowires on 2017-07-12 07:50:44 Wow, that's impressive! Can you explain more about how the video works? You found a 9 inch CRT monochrome SVGA monitor somewhere, or have I misunderstood? I don't recall ever seeing such a thing before. | |
| Posted by: butterburger on 2017-07-12 07:52:29 This project is fantastic. It involves case-modding, part substitution, tailored wiring, scrap plastic; all in all a good mod. | |
Posted by: toledogeek on 2017-07-12 08:41:00Wow, that's impressive! Can you explain more about how the video works? You found a 9 inch CRT monochrome SVGA monitor somewhere, or have I misunderstood? I don't recall ever seeing such a thing before.the monitors come up on eBay every once in a while, its an old Point of Sale monitor, it's actually multisync! (640x480, 800x600) and connects though VGA. i just used one of those NEC mac adapters. other than that, i used the video out board that was on the performa. So, MoBo edge connector ->ribbon cable -> video out board -> DB15 to VGA adapter. i could of saved some space if i went and wired it up directly, but i had space to spare, and it was kind of a "lazy sunday" build, so i didn't want to sink too much time/thought in it. i bought the monitor initially to do greyscale in an SE/30 with a radius color pivot card. it worked, but I didn't like how crowded it was going to be with a SCSI2SD, twinspark, daystar powercache, radius pivot and Ethernet. i would have had to remove the analog board and power supply entirely in order to make it fit, then build up something to tetris in there. the Mac classic was a much cleaner starting point. | |
| Posted by: just.in.time on 2017-07-12 08:45:32 Very cool! =D | |
| Posted by: Trash80toHP_Mini on 2017-07-12 16:24:17 Must chime with the applause. I'm tempted to call it epic, but doesn't sound like it took quite long enough to qualify for that particular adjective. A most impressive hack indeed! :approve: | |
Posted by: toledogeek on 2017-07-13 02:06:39Must chime with the applause. I'm tempted to call it epic, but doesn't sound like it took quite long enough to qualify for that particular adjective. A most impressive hack indeed! :approve:Thanks! But no, its not epic, it was a convenient hack/case mod job using what i had laying around. it required no real technical skill or knowledge. it took about 6 man hours total, so no real struggle, things worked out pretty naturally. that being said, it accomplished what i was shooting for with all the SE/30 upgrades... a fast, greyscale compact mac. just this is a bit of a cheat (powerPC) but it cost less than the SCSI2SD and RAM for the SE/30. | |
Posted by: Trash80toHP_Mini on 2017-07-13 06:39:55Thanks! But no, its not epic, it was a convenient hack/case mod job using what i had laying around. it required no real technical skill or knowledge. it took about 6 man hours total, so no real struggle, things worked out pretty naturally.Sounds like a recipe more folks should sample, I will be.. | |
| Posted by: just.in.time on 2017-07-13 08:34:35 I wanted to do something similar using a Plus and PB 540 that had busted hinges. I then took a long pause as I realized the display cable would most likely be too short. | |
| Posted by: Trash80toHP_Mini on 2017-07-13 08:42:12 Take another look at that one. Rotating the LCD through 180 degrees will almost certainly work if the board's narrow enough. Angling the board to the max might help and peripheral connections are easily modified. [🙂] ]'> Works great for 1400cG3izing the 12" RGB Pizza Boxtop. [}🙂] ]'> | |
| Posted by: just.in.time on 2017-07-13 12:02:23 Hmm, I may have to revisit that idea then, thanks for the tip! 🙂 | |
| Posted by: toledogeek on 2017-07-14 03:08:19 I found a laptop "blower" style fan to fit next to the heatsink, so now the temps are in the happy range. it just barely fits between the RAM and ROM/cache SIMMs. I'm running the rear fan as in intake and not exhaust, which seems to work better. the rear fan is running @ 8V and the CPU fan at about 2.5, which is enough to keep it cool and quiet. its ran all night and still just slightly warm to the touch. the ethernet card arrived yesterday, so now its on the interwebs. i found yet another 9" SVGA Monochrome monitor on eBay.... so i bought that one too. who knows where that one will end up. | |
| Posted by: Johnnya101 on 2017-07-14 13:47:44 I've got a spare Classic crt too if anyone needs an extra for hacks. And a case. And chassis... | |
| Posted by: techknight on 2017-07-14 16:33:45 You could have kept the original CRT so you could have the correct white color temperature, just swap the yoke around. | |
Posted by: toledogeek on 2017-07-15 04:51:29You could have kept the original CRT so you could have the correct white color temperature, just swap the yoke around.thought about that, but i needed the CRT for a SE/30 that had some pretty nasty burn in. i might switch it once i find another CRT/hopeless compact. in the meantime, it'll be getting a bigger SSD once my compact flash cards arrive. Ive also swapped the speaker from a flat-panel TV in there. its smaller but much better sounding, i was able to aim it down though the front vents. | |
Posted by: Scott Baret on 2017-07-17 21:19:53Ive also swapped the speaker from a flat-panel TV in there. its smaller but much better sounding, i was able to aim it down though the front vents.Interesting! What model of TV was it? I'm hoping to mod a computer with a better internal speaker myself... | |
Posted by: toledogeek on 2017-07-23 06:12:14Interesting! What model of TV was it? I'm hoping to mod a computer with a better internal speaker myself...it was some random vizio that was getting scrapped. i have no idea what the model was. the audio amps in these are not very particular on load.. as long as it isn't below 4 ohm it should be ok. tiny speakers have come a long way in just the past 10 years, so its a worthy upgrade for a lot of older macs. | |
| 1 > |