68kMLA Classic Interface
This is a version of the 68kMLA forums for viewing on your favorite old mac. Visitors on modern platforms may prefer the main site.
| Click here to select a new forum. | |
| Mac SE memory upgrade issue and where to find the floppy for the Radius SE accellerator | |
| Posted by: ioncehadamac on 2016-11-06 21:00:15 Hi all, I did order on Ebay a set of memory stick (1 MB) to max out my SE, but once I did install them, nothing good came out of it. At first boot with all 4 memory stick, the computer boot and no chime sound, the screen look like it has white rectangle all over it, while the sad mac logo is all broken up. I did close everything and replaced 2 of the new modules with 2 old ones, so I still have 4 MB (the machine came with 2x1M and 2x256K modules). Same here; with garbage on screen (although it was a different kind of garbage, but still the sad mac logo was all messed up. It works fine with the original memory so can't be the connectors that are defective (I did clean them with alcohol to be sure). What is going wrong? Do I have defective memory modules? I did get them from Ebay, the seller did mention that they are working in Macintosh SE; and they were sealed. Also I was lucky enough to find another SE which has a dead CRT, but the logic board is still good, and it has a Radius SE mounted on it. I am planning to transfer that board on my logic board; but I recall that you need a disk to have the OS to recongize the card...where I can find this disk/image? If the card works even without the disk, I am even happier; but if it doesn't, I am basically stuck and will not be able to use the accellerator. Thanks in advance! | |
| Posted by: peafour on 2016-11-07 07:05:34 Did you check the jumper/resistor? There's either a jumper or resistor (R35) above SIMM 1, that needs to be set properly (jumper), or clipped and moved aside (resistor) with 4MB of RAM. More info here: http://lowendmac.com/2016/memory-upgrades-mac-se/ | |
| Posted by: ioncehadamac on 2016-11-07 10:45:58 Hi Peafour, I did not check the resistor, since I recall that there is no resistor if you have more than 2 MB (mine ahs already 2.5); but I forgot about the jumper. I will have to check it. | |
| Posted by: ioncehadamac on 2016-11-08 20:39:38 Also does anyone have the radius SE accelerator software? I can't find it anywhere, and the only place where it was available does not have a working link anymore (Mac Driver Museum) | |
| Posted by: BadGoldEagle on 2016-11-09 01:29:46 You lucky guy! I'd love to get my hands on an Acclerator 16 or 25 for my SE! The mac driver museum is no more. There are a few mirrors but they're not 100% complete. The MacGUI.com has a few drivers, including the one you're looking for. Download it here. | |
Posted by: ioncehadamac on 2016-11-09 07:41:05You lucky guy! I'd love to get my hands on an Acclerator 16 or 25 for my SE!Thanks a lot!!!! Also is there a trick to put together the SE logic board, once you have the Accelerator card on it? I am trying to slide it on the bottom of my working SE and there is no space nor clearance for it to actually fit in the small space, since the board is touching the metal cage. I did look for videos or manuals about how to put it in, but had no luck (and the fact that I did receive the card and the broken SE as separate didn't help, since I could not see how was it installed originally). Can't wait to have the SE up and running with all the fixes! | |
| Posted by: Compgeke on 2016-11-09 11:44:43 Motherboard and chassis have some notches on I believe the left side with the machine sitting face down. Align the motherboard with those, angling the non-notched side in then pushing the other into the notched out holes. Once you do that just push down to get it fully aligned. Sliding from the top is a huge pain and might catch the accelerator card on the chassis. Also a pain to get the speaker connected when sliding from the top. | |
| Posted by: Unknown_K on 2016-11-09 12:41:06 I don't think the Radius accelerator fits in the original Mac SE case, the SE FDHD case has more room in it. | |
| Posted by: Compgeke on 2016-11-09 15:52:49 Unless the Radius is thicker than the GCC Hypercharger it should fit fine. I had the Hypercharger in an original SE and had no clearance issues | |
| Posted by: Unknown_K on 2016-11-09 16:36:12 I will have to check it again, but I tried installing a Radius upgrade into an original 800K floppy SE and it didn't seem to fit. The SE FDHD has a different metal frame with much more room. | |
| Posted by: ioncehadamac on 2016-11-09 20:22:06 Ouch; they are both 800K+HD floppy models 🙁 Is there a way to "mod the frame" so it won't have issues? I did notice that the logic board is inserted at an angle; which is why it can't fit the card. If it was going in straight, there is enough clearance to fit it, but the part where the board is closer to the frame can barely fit the logic board itself. In the worst case I have to get another SE just for the frame? My house will be full of SE 😀 | |
| Posted by: BadGoldEagle on 2016-11-11 09:14:19 Nah an original SE chassis should work fine. The levco and radius accelerators have 020 accelerators and were introduced in 1987/1988. The SE FDHD wasn't even a thing back then. You need to bend the frame slightly to get the card in. Align the card with the notches on the right when the mac is sitting face down. Bend the left side of the chassis outwards. Gently slide the card in. Push down the card so that the two tabs on top of the board are placed correctly. Done. I need to do this every time I have to remove/put back the Hyperdrive logic board in my 512k. You'll get the hand of it. There isn't enough clearance if you slide it in the usual way. It works great using my method. | |
Posted by: ioncehadamac on 2016-11-11 12:38:57Nah an original SE chassis should work fine. The levco and radius accelerators have 020 accelerators and were introduced in 1987/1988. The SE FDHD wasn't even a thing back then. You need to bend the frame slightly to get the card in. I see, so it works even on a standard case? When you say "bend the left side of teh chassis outward", you mean the support where the motherboard slide in? The issue when I try to slide the motherboard in, is that one of the chip of the expansion board is actually hitting the top part, so I assume that to fit it, I have to bend out the rails on the left, position the right part of the motherboard in place (so the tabs on the logic board will fit as they should, without the accelerator), and then re-bend back the left rail to hold the motherboard in its original position. Seems quite a hassle; versus get a superdrive cage and replace it; if that is actually easier because it has more clearance. I am mostly concern to damage something while forcing in the card | |
| Posted by: Compgeke on 2016-11-11 13:32:28 Grabbed a pic of the notches. Does yours not have these? If it does, align the board notches with the cutouts and push in. Once the board is all the way back just slide it down into place. Can also be removed the same way. This particular system is from '87 and has a Dove Fastnet SE shoved in, not quite as tall as a CPU upgrade but still has plenty of room on top. 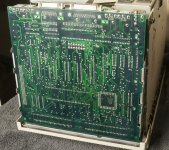 | |
Posted by: ioncehadamac on 2016-11-11 13:34:47Grabbed a pic of the notches. Does yours not have these? If it does, align the board notches with the cutouts and push in. Once the board is all the way back just slide it down into place. Can also be removed the same way.Thanks for the pic! This is the position of my logic board when I remove it; I slide it up briefly and once the tabs on the right are free, I pull toward me instead of sliding it up further, so I can disconnect the speaker and slide it off the rail on the right. So to put the expansion card I have to leave the logic board in that position as in the photo? | |
| Posted by: Compgeke on 2016-11-11 14:26:01 It's basically the opposite of the removal. If you line it up for installation and shove in it might take a bit of force but it'll "snap" back into the rails and then you can push down. In that pic I'd pushed it down just a little to grab the pic otherwise it might want to pop back out. | |
| Posted by: ioncehadamac on 2016-11-11 16:45:04 I see, I did leave the logic board hanging on one side, and was able to fit the card in. The whole assembly close up, the connectors are a bit to an angle but so far it is booting up happily! I have no idea how to properly sit the logic board in, since I did notice that the major issue is a connector coming out of the Radius SE (it is the 16 model, that's what show up at boot). This small plastic connector protrude right from the top of the SE expansion connector; no clue what is it for, but it seems to fit in a small rectangular cut done on the metal cage, so I guess that;s how it goes 🙂 I wish there were photos or videos about how to install this, or even a manual, but there is no trace of the Radius website, not even on the sites that take snapshots of the old sites. At lest I am happy that the card works (at least show the logo, I can't really tell much of a difference using the Macintosh so far). The only problem that I did notice is that I can't boot from HD anymore (neither internal scsi nor the SCSI2SD adapter), as long as the card has the code cache and memory cache enabled. I have at boot, keep pressing the mouse button to get the config panel of the accelerator, and disable these 2 cache. I wish there was a way to save the settings, but every time you turn the SE on again, it will go by default with both options on. Now trying the archive to finally install the software and see how it goes 🙂 Thanks a lot for your help! | |
| 1 |
