68kMLA Classic Interface
This is a version of the 68kMLA forums for viewing on your favorite old mac. Visitors on modern platforms may prefer the main site.
| Click here to select a new forum. | |
| New PCB design: 840AV/8100 Stealth ATX | |
| Posted by: croissantking on 2026-04-04 17:53:42 I wanted to share this layout for a brand new PCB that I've just about finished, one of my first proper designs. It is intended to fit like a glove inside the Delta power supply housing that's common to the Quadra 840AV and Power Macintosh 8100. These PSUs are failure-prone and notoriously difficult to repair, so I was keen to come up with a classier solution than just stuffing an ATX PSU inside the case with an adapter and calling it a day. The new PCB replicates the exact dimensions as the original Delta lower PCB. It's designed to have the internals of an ATX power supply stood off above it as a mezzanine board. I've laid it out to accept an Antec EarthWatts PSU I had available, but it could likely be adapted to other models just by adjusting the locations of the four standoff mounts. The design reuses the stock AC inlet board, and incorporates both the original monitor passthrough power relay and fan control logic. The 20/24 pin ATX harness is intended to be cut short and looped into the +12V, GND, -12V, +5V, PS_ON and +5VSB vias seen at the top of the new PCB. This is so a soft power inverter can be integrated, and also allows the original modular Mac PSU connector to be fitted in its original location. I've mocked up the design mechanically by using the old Delta PCB as a base, it's very sturdy. I'll get this sent off to print shortly. Once I'm happy the design functions as intended, I'll of course be making it available on Github 🙂 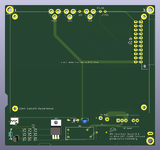 UPDATE: Project now available for download at https://github.com/croissantking/840AV-Stealth-ATX | |
| Posted by: Durosity on 2026-04-04 22:49:49 Oh this is perfect! I need to replace the PSU in my 8100 with an ATX and I was trying to figure out the logistics of getting it into the existing PSU and making it look stock! | |
| Posted by: Gothikon on 2026-04-04 23:54:02 Looking forward to seeing how this turns out! | |
| Posted by: croissantking on 2026-04-08 11:33:22 I've finally sent this off for fabrication. I thought I was about 5 minutes away from finishing but it ended up taking a few hours more. There's so much detail to oversee. | |
| Posted by: Trash80toHP_Mini on 2026-04-08 11:51:45 WOW! Great job there, love it. How many watts is that PSU and what what's the original? | |
Posted by: croissantking on 2026-04-08 17:42:15WOW! Great job there, love it. How many watts is that PSU and what what's the original? 380W. The original is a 200W but it has a beefier 5V rail (30A) than the Antec (20A), which is the important thing here. | |
Posted by: finkmac on 2026-04-09 05:32:38The design reuses the stock AC inlet board, and incorporates both the original monitor passthrough power relay and fan control logic.finally, a GOOD mac atx adapter 🙂 excellent work. | |
Posted by: Durosity on 2026-04-15 16:13:57380W. The original is a 200W but it has a beefier 5V rail (30A) than the Antec (20A), which is the important thing here.Which version of the EarthWatts are you using? There seems to be a fair few around, but I can’t see any supplying 30a on the 5v rail. | |
Posted by: croissantking on 2026-04-16 05:08:12Which version of the EarthWatts are you using? There seems to be a fair few around, but I can’t see any supplying 30a on the 5v rail. I worded my last message badly. Despite the Antec being 380W it only supplies 20A on the 5V rail. The 500W model supplies 24A which is quite nice. It’s one of the early EarthWatts with Seasonic internals. | |
| Posted by: LaPorta on 2026-04-16 05:46:26 I will buy this INSTANTLY when you have available. I gave up troubleshooting my Deltas for my 8100 a long time ago. Can you also post a list of parts (possibly with links) as to what else is needed to fully complete this along with your PCB? | |
Posted by: croissantking on 2026-04-16 05:53:01I will buy this INSTANTLY when you have available. I gave up troubleshooting my Deltas for my 8100 a long time ago. Can you also post a list of parts (possibly with links) as to what else is needed to fully complete this along with your PCB? Of course. Are you thinking to pick up a used EarthWatts supply or adapt the PCB to something else? | |
Posted by: LaPorta on 2026-04-16 16:38:36Of course.I can use EarthWatts if that was your design. | |
Posted by: croissantking on 2026-04-22 01:18:31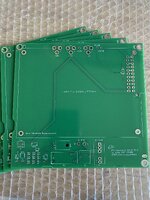 The boards are here - I’ll be assembling one of them today. It’s very rewarding to see your design in the flesh after working on it for so long. | |
| Posted by: LaPorta on 2026-04-22 03:14:59 Excellent! This is fantastic work. I look forward to a parts list and buying from you 🙂. | |
| Posted by: pom on 2026-04-22 04:36:42 As a beginner in electronics, I have a question regarding some of the traces. Those that are very thin like the one for PS_ON I understand the width is calculated based on the maximum current, so a thin trace seems fine for a low current signal like PS_ON However wouldn’t you have some benefits in increasing the width a bit ? (The same width as the pads of U1 for example) It would make the trace more resistant to oxidation over time (and also reduce resistance a bit) | |
Posted by: croissantking on 2026-04-22 04:41:04As a beginner in electronics, I have a question regarding some of the traces. Those that are very thin like the one for PS_ON That’s a good point. I’ll tweak them for the next (release) version. | |
| Posted by: croissantking on 2026-04-22 17:49:39 Photo updates after assembly and fitment testing. Now I'm ready for the power on test tomorrow. I got the base/collector/emitter pins mixed up on both fan control transistors for some reason, so a few bodge wires were needed. It took me most of the day to figure it out. I'm pretty pleased with the cable management and general tidiness. The fan control circuit has a little thermistor that runs the fan between 6.9V and 11.8V depending on temperature. There may be a more optimal location for the thermistor, which is just on the board next to the fan connector at the moment. 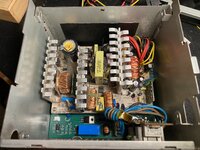 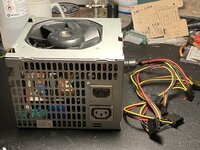 | |
| Posted by: croissantking on 2026-04-23 05:16:43 The PSU passed the smoke test and is working great, including the monitor passthrough. My 840AV is running for the first time as a complete machine since I acquired it. Between the logic board, PSU and case repairs, it's been an immense amount of work – but totally worth it. I need to make some corrections to the board layout then I'll post the gerbers + BOM + assembly instructions. Some parts are reused from the stock PSU. @LaPorta send me a DM if you want one of these pre-release PCBs as I have four spare. You'd just need to run some bodges if you want the fan circuit working (because I wired it up wrong) – or you could use the fan header on the EarthWatts and not worry about it. | |
| Posted by: croissantking on 2026-05-13 21:57:02 The GitHub repository is now public, here: https://github.com/croissantking/840AV-Stealth-ATX Now it's time the community gets to work to restore those dead PSUs 🙂 FWIW, I've discovered some models of Seasonic PSU (in addition to EarthWatts) use the same donor board, these are listed in the readme. | |
| Posted by: Joopmac on 2026-05-13 23:42:03 Awesome!! Very clean and nice design. Just sold a 840av, but will keep this in mind | |
| 1 |