68kMLA Classic Interface
This is a version of the 68kMLA forums for viewing on your favorite old mac. Visitors on modern platforms may prefer the main site.
| Click here to select a new forum. | |
| Jasmine Technologies BackPac 40 | |
| Posted by: David Cook on 2024-12-22 16:10:27 I recently purchased a Jasmine BackPac 40, along with a Mac Plus. A very attractive paring! 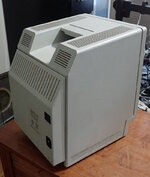 To install it, you first remove the two bottom screws and the battery cover from the Mac Plus. The clock/pram battery stays in place. The Mac's power switch is flipped to the ON position. The BackPac has a power plug and flexible tab that mate to the power input and battery cover's tab slot on the back of the Mac Plus. 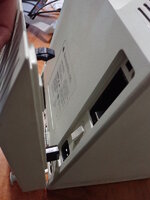 But wait! Before you snap it into place, the inside front of the BackPac has a little storage area for the screws and battery cover you removed, so that you don't misplace them. Cool, huh! 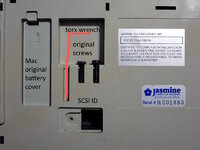 The torx wrench is missing from mine, as is the cover to the dip switches to set the SCSI id. In fact, for reasons I discovered later, the SCSI ID selector is not visible on mine. To complete the installation, thumb screws with coin slots attach the bottom of the BackPac to the screw holes at the bottom of the Mac Plus. Then, a flexible short SCSI connector attaches to the external SCSI port on the Mac Plus. 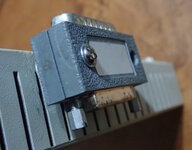 The BackPac is firmly attached. The plastic is really high quality, as is the design and attention to detail. Someone very skilled and caring made this. And, best of all, it still works! When you flip the power switch on the BackPac, it powers up both the drive and the Mac Plus. INSIDE To look inside the BackPac, you must first remove it from the computer. Then, fully withdraw the thumb screws and two flat head (wood?) screws. The case can then be popped open with a spudger. 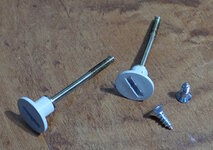 A couple of things caught my eye. Why the big controller board? What's with the electrical tape on the power input? 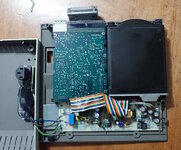 Looking more closely, the hard drive is split in twain! The controller board is usually attached to the bottom of a drive. A colorful ribbon cable connects them. 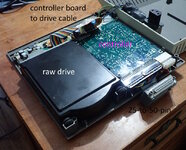 This is not the original 40 MB hard drive. Someone upgraded it. Maybe the electrical tape on the power input was needed when a part needed to be moved to make way for the hard drive controller board? In fact, the seller was kind enough to include the original 40MB drive. This is thin enough to fit on the left side of the BackPac without needing to be split. The SCSI ID pins of the original drive are accessible through the case opening. 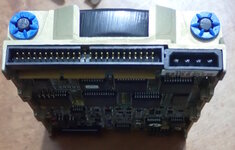 Although this makes sense, did someone at Jasmine really think ahead to design the right side of the case to attach a split controller board? Maybe the BackPac was originally always going to have a larger drive, but then the smaller drive became available? Here are the labels of the larger and smaller drives. 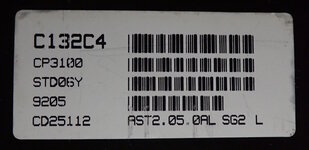 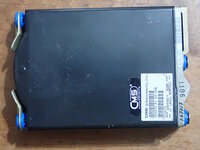 Both drives thoughtfully include anti-vibration mounts. This is particularly important to avoid rattling the internals of the Mac Plus. 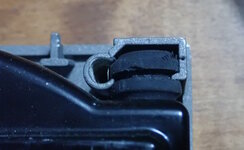 Here's a close-up of the tape covering the input wires and circuitry. This looks to be the relay that passes power through to the Mac Plus when the BackPac is turned on. 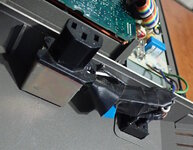 Power supply label. Skynet is real. 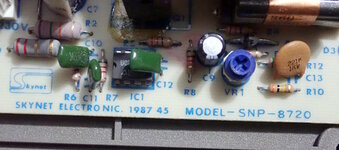 The Jasmine BackPac 40 shipped in late 1987. Here is the ad from the December 1987 issue of MacWorld. The price was $1299, which was about half the price of a Mac Plus. Jasmine charged a surcharge for credit cards. So, it could have been $1339, which is $3719 in 2024 dollars. 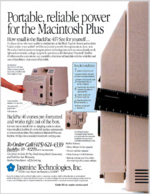 The Macintosh SE came out in the spring of 1987, but the BackPac was not designed for the SE. It blocked the fan vent. And, the Mac SE had a mounting bracket for an internal drive already. In later years, Jasmine followed up with a thicker BackPac model with a wider variety of drive capacities and even an internal modem. - David | |
| Posted by: LaPorta on 2024-12-22 17:25:40 That is really, really cool! I love Jasmine stuff. I've been looking for a Jasmine DirectServer...but I can barely find info on it online even. | |
| Posted by: jmacz on 2024-12-22 23:23:02 Really cool write up! I remember seeing these ads as a kid. | |
| Posted by: superjer2000 on 2024-12-23 01:20:26 Thank you for this! I wanted a Jasmine drive so bad back in the day, but they were much more expensive so I settled for a crappy Hard Drives International external drive when I added an HD to my Classic. I am a bit surprised to see a CMS mechanism as original fitment and not a Quantum to be honest. Does it seem that splitting the drive from its controller was done just to make a replacement drive fit (ie the original drive wasn’t installed like that?). Seems strange it fit so well. Did the drive work? I’m assuming the CMS drive is dead? Lastly, does anyone remember the name of the small Jasmine HD that attached to the back of a Mac almost like a modern day SCSI2SD. I think it used a 2.5” mechanism. | |
Posted by: David Cook on 2024-12-23 08:58:28Does it seem that splitting the drive from its controller was done just to make a replacement drive fit Yes. Exactly. The fact that the case includes clips to hold the controller board separately seems like they planned it this way. I might have made the case thicker to avoid this (subsequent BackPac releases were thicker), but their ad includes a ruler showing how thin the case is, so I guess it was a selling point. i’m assuming the CMS drive is dead? Sadly, yes. After multiple attempts, I pulled the cover off and the top platter has visible marks of damage. It looks like the head got stuck and the residue scratched another part of the surface. Really cool write up! I remember seeing these ads as a kid. Thank you! .but I can barely find info on it online even. I was surprised by this as well. I distinctly remember how cool these were when they came out. I assumed more sentimental media would be archived about it. | |
| Posted by: LaPorta on 2024-12-23 09:15:40 If I could find one I’d buy it. I’ve still got the DirectDrive 20 my dad got back around 1987, has worked without issue since the day he got it. Remarkable equipment. | |
| Posted by: HardwareHacker on 2025-05-07 22:33:48 I literally just bought the 20MB version on ebay a few minutes ago. I'm so excited. Are you still able to use the battery in the Mac Plus battery compartment? I assume yes. I also agree with @superjer2000 regarding the writeup. Great job! Here are the pictures from the ebay listing (yes for some reason two different models are shown but other than the label they appear identical):  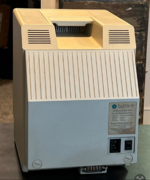 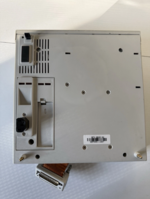 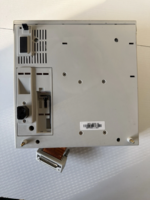 | |
Posted by: David Cook on 2025-05-08 08:08:07Are you still able to use the battery in the Mac Plus battery compartment? I assume yes. Yes! Nice pictures | |
| Posted by: zigzagjoe on 2025-05-08 09:14:54 That's a pretty fantastic level of care that went into that... from styling, to how it attaches, vibration mounting on the HDD, even thoughtfully providing the wrench and a place to keep the original screws. I really appreciate that. | |
Posted by: HardwareHacker on 2025-05-08 14:08:44That's a pretty fantastic level of care that went into that... from styling, to how it attaches, vibration mounting on the HDD, even thoughtfully providing the wrench and a place to keep the original screws. I really appreciate that.So do I. I also appreciate the work out into your products as well @zigzagjoe , just saying | |
Posted by: zigzagjoe on 2025-05-08 16:27:16So do I.Thanks 🙂 I aim for the same goals with the things I design and build, so I thought it was worth mentioning they did a real nice job with this. | |
| Posted by: Trash80toHP_Mini on 2025-05-08 16:38:11 Someone has just gotta model this thing for printing! Adding it onto the back and using a PCB adapter offsetting its neck board gubbins down and to the left is the only possible way to fit my 10" Color CRT "into" an "unmodified" Classic Mac case . . . sort of. 😜 | |
| Posted by: HardwareHacker on 2025-06-09 23:03:43 Unfortunately the ribbon cable got damaged and needs to be replaced. I'll take pictures of the unit when I take it apart to investigate how the cable connects internally | |
| 1 |