68kMLA Classic Interface
This is a version of the 68kMLA forums for viewing on your favorite old mac. Visitors on modern platforms may prefer the main site.
| Click here to select a new forum. | |
| Repairing a Blue & White Studio Display CRT (repost) | |
| Posted by: dontdoxmeman on 2021-08-10 19:45:09 Reposting this thread since the old forum ate it: My Studio Display I’d recently purchased on eBay had a failing flyback transformer, which was unfortunate since the plastics and the tube itself were all in great condition. The monitor would make a loud click/popping spark noise and the image would go away and come back with a zooming effect. I found that the HR46162 was a equivalent part to the original. Despite a forum post elsewhere I saw where the poster thought the HR Diemen flyback wasn’t correct because it didn’t have the same number of pins, I took a chance and ordered one from https://www.electronica-usa.com/product_HR46162.html. Before ordering I noticed that (with the old flyback still in-circuit) the missing pins were directly connected to others, so I figured it would be fine. Turned out that yes, those missing pins are internally connected.   The new flyback came with an instruction to disconnect a particular capacitor from the monitor’s circuit board. I found a cap with the same silk screened PCB reference number as the instructions and cut it off. The new flyback didn’t quite fit in place of the old one due to closely packed components, but I shaved off an unused part of the flyback’s board to fit it.  I ended up cutting the wires from the old flyback that went to the video board, and soldered the new flyback’s wires to their ends since the new one didn’t have connectors on those wires.  To give the new flyback as long a life as possible by keeping it from overheating, I installed a spare PC case fan I had lying around in the top of the RF shield for the monitor. I found a 5V supply in the monitor and soldered some pins to it and ground so I could just attach the case fan easily.   With the new flyback transformer, and after adjusting the G2 and focus, the monitor looks great! The Diamondtron CRT is just fantastic.  Since somebody asked on the previous thread, here's a link to the disassembly guide: https://www.applerepairmanuals.com/the_manuals_are_in_here/Studio_Display_17.pdf | |
| Posted by: Juror22 on 2021-08-10 20:37:00 Terrific work and I love the detail in your repost. It would be fun to have a CRT that big (and nice looking)! | |
| Posted by: re4mat on 2021-08-12 03:18:02 Nicely done! How did you figure out that there was an equivalent flyback in the first place? | |
| Posted by: CircuitBored on 2021-08-12 03:44:02 Thanks for reposting this! I still have two of these CRTs that need new flybacks. I have the parts, I just haven't motivated myself to haul these massive screens up onto my workbench yet. The disassembly guide will come in very handy, cheers for adding that. Congrats on a successful repair of a great bit of kit. | |
| Posted by: LaPorta on 2021-08-12 06:19:25 very nicely done. It is experiments like these that will help us all in the future when parts inevitably fail. | |
Posted by: dontdoxmeman on 2021-08-13 22:06:27Nicely done! How did you figure out that there was an equivalent flyback in the first place?If you google M6496 flyback you'll find some stores that sell the HR Diemen equivalent. https://www.hrdiemen.com/reparation/flyback/model/46162 | |
| Posted by: KGLlewellyn on 2021-11-07 00:00:52 Sorry to bump an old post, but I'm gonna be doing this over the next week or so. When you soldered the wires to the wires from the flyback to the video board, was it just a matter of soldering matching wires? If not, how did you know which wires went where? | |
| Posted by: KGLlewellyn on 2021-11-20 18:25:01 So I figured it out. Wiring for the Flyback goes as follows New Flyback Wires --> Old Wires Black --> Red (Focus) White --> White (Focus) Red --> Orange (G2) Got my new flyback installed and the Studio Display is working again! Gosh darn do I love this monitor! 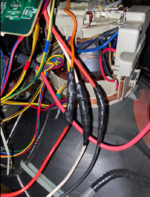 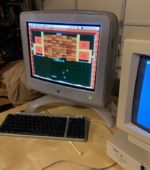 | |
| Posted by: cheesestraws on 2021-11-21 02:25:39 Well done! | |
| Posted by: aeberbach on 2021-11-21 14:02:28 Congratulations, I had one of these monitors and the repair manual - I though disassembly looked really hard! | |
Posted by: CircuitBored on 2021-11-21 17:33:24Got my new flyback installed and the Studio Display is working again! Gosh darn do I love this monitor! Nice job! It's almost time for me to do this job myself. I've been using my Studio CRT a lot over the past few weeks and the clicky-zoom-out moments are getting more and more frequent. | |
| Posted by: mectojic on 2023-07-20 14:47:33 Hi, I'm hoping to do this repair too, once I've got the HR46162 part. Unfortunately OP @dontdoxmeman , the photos for the tutorial have disappeared. Any chance you could reupload? I'd do anything to get my 2 17" displays repaired. | |
Posted by: Renegade on 2023-07-21 00:33:26Hi, I'm hoping to do this repair too, once I've got the HR46162 part. Unfortunately OP @dontdoxmeman , the photos for the tutorial have disappeared. Any chance you could reupload? I'd do anything to get my 2 17" displays repaired. This WayBackMachine snapshot has all the pictures: Repairing a Blue & White Studio Display CRT (repost)Reposting this thread since the old forum ate it: My Studio Display I’d recently purchased on eBay had a failing flyback transformer, which was unfortunate since the plastics and the tube itself were all in great condition. The monitor would make a loud click/popping spark noise and the image...
| |
| Posted by: riveducha on 2023-08-04 09:07:13 @mectojic Did you do your repair already? I just put together a video of the process along with some additional stuff I figured out while doing it for my Studio Display, partly based on this thread: https://www.riveducha.com/fix-apple-studio-display-flyback Hopefully it helps fill in some of the gaps between the photos from this thread. Going to add some more photos over the weekend and then put together a post for this forum as well. | |
| 1 |