68kMLA Classic Interface
This is a version of the 68kMLA forums for viewing on your favorite old mac. Visitors on modern platforms may prefer the main site.
| Click here to select a new forum. | |
| Mac II refurbishment.. | |
| Posted by: buserror on 2020-05-18 12:06:26 Hi Everyone, first post here. I used to be a Mac developer, between maybe 1986 until 2007. I still have a large collection of machines, and some prototypes, and I've been making myself a small museum in a spare bedroom, quite frankly really Apple II stuff. But then I manage to find a Mac II, completely pristine, with 13 Trinitron etc for a song, and I bought it. Now I'm in the 'rabbit hole' as you must realize 🙂 I never had a Mac II, I worked on some of the series, but never 'owned' one. I have quite a few powerbooks, 140, 180, 180 165c, 230. 280c and even a 180 with a wireless modem in place of the floppy disk! (one of 2 prototypes) -- but mostly in these days, I only owned a powerbook in my name... Anyway, the good news is that quit being a Mac dev to go more toward hardare/firmware/linux things, so I got quite a few tools to rework bits and stuff, thats something I wouldn't have been able to do all the way back then! Since trying to start the mac (and failing) I discovered pretty much all there is 'wrong' with these machines. The 2 batteries (holders on order now) and all the caps (ordered) the corroded traces and the 4xNAND gates, and the other bits I noticed I could change. I've just joined so I can document this here, as I picked a few threads that helped a lot understanding what's going on with this machine! 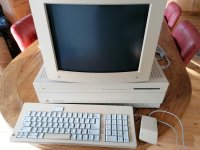 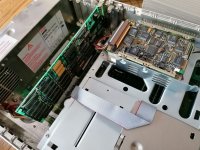 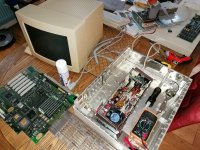 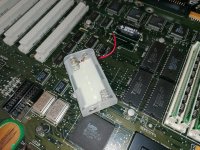 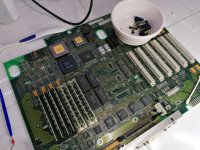 | |
| Posted by: blusnowkitty on 2020-05-18 12:10:05 Looking good! Just a small suggestion, consider using CR2032 coin cell batteries in place of the standby and PRAM batteries. They won't leak like the original lithiums and alkalines can, and they look a lot nicer on the board too! I use a pair of 2032s in my II and they work great. | |
Posted by: buserror on 2020-05-18 12:14:13Looking good! Just a small suggestion, consider using CR2032 coin cell batteries in place of the standby and PRAM batteries. They won't leak like the original lithiums and alkalines can, and they look a lot nicer on the board too! I use a pair of 2032s in my II and they work great.I was pondering that actually, but, I couldn't find a coin cell holder that would 'look' nice in the place in question. If you have any suggestions I'd go for that as (like everyone) I don't trust these 1/2AAs -- never did, they used to fail even back in the days! Also, any suggestions on what else to replace since I'm there and desoldering bits? Also... any suggestions on how to clean the damage? To be fair it's pretty 'light' by the standard I've seen. There's a trace under Nubus 4 (or 5) that took a hit, but it looks like thick copper and continuity seems OK. There are a couple of other traces that are a bit more problematic, whith what looks like corrosion /under/ the mask. Should I strip these and re-lay some solder? Should I leave it alone? | |
| Posted by: buserror on 2020-05-21 09:37:08 Well, so work has started; I got all the parts, removed all caps, removed the UB1/2 and the SCC drivers started cleaning the joins, scraping the vias and looking for corroded traces. Already repaired one near the ROM, where one of the long tracks near the C7 label looked corrored, so I scapped some on each side, tested continuity and sure enough, no go. I soldered a new tiny enamel wire there (it's barely visible!) and superglued it, good contact now. I found another one near UB1 that should be easy to repair once I've put the SOIC14 in place. I've been using some sort of "glass fiber pen" to scrape a few contacts, works great. BTW, the enamel wire in the pic is THE famous R3<->R18 trace -- the resistors are under the board, but the trace comes back up and here it is! So it seems the acid is particularly active to traces that are under (even minuscule) power, as that's the only one that is that badly damaged. Same toward the power button; one trace out of the blue while all the others are OK. 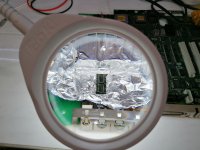 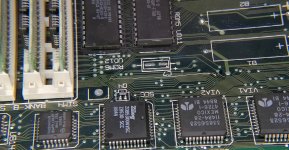 | |
| Posted by: LaPorta on 2020-05-21 09:50:44 Nice going so far. I, too, have learned the hard way to use foil to shield other components. Not to mention the plastic headers... | |
| Posted by: buserror on 2020-05-22 09:23:45 Some more work today, cleaned all the caps locations; added 3 new wires, the worse being around the cap near the Apple Sound Chip, there's 3 traces there WAY close to the cap, and these got damaged. Only one needed a wire tho. I also saw a couple of traces that look 'dark' but one diseapear under a SIMM slot, and the other one of the niggest QTFP at the bottom of the board. Oh well, I'll have to cross my fingers and hope they still do the job, because I don't see myself reworking that huge chunk! Now a bit stuck trying to clear the holes of the thru-hole caps (posted another topic about that) and I'm nearly where I'll be able to solder all the new bits on! I'm really taking my time here, scrapping a few vias etc to remove corrosion, etc. | |
| Posted by: bibilit on 2020-05-22 10:55:32 Concerning the PowerBook 180 with a wireless modem in place of the floppy drive, any relation with the French (don’t think was available elsewhere) PowerBop ? https://fr.m.wikipedia.org/wiki/PowerBop | |
Posted by: buserror on 2020-05-22 12:05:52Concerning the PowerBook 180 with a wireless modem in place of the floppy drive, any relation with the French (don’t think was available elsewhere) PowerBop ?Yep, that's the one! Well ahead of it's time, as apple was, at the time... | |
| Posted by: joshc on 2020-05-22 20:34:59 Are you based in the UK? This looks very similar to one I was hoping to get... bw🙂 If so, I'm glad to see it's gone to someone who knows what they're doing. If you are stuck removing solder from through holes, I've been there and the only way I got around it was to buy a desoldering station, total life saver for doing this kind of work. | |
| Posted by: bibilit on 2020-05-22 23:11:48 As the picture included in your posts is an Apple Djinn, i am guessing your are based in France, both products were never delivered elsewhere in the world. | |
| Posted by: buserror on 2020-05-23 09:36:03 Ahaha, I'm an expat. I worked for Apple ER&D in the 90's on the Djinn and Apple Telecom 3.0 (and a few other bits) -- but I moved to the UK in '99 ! So you were both right 🙂 @joshc yes I picked that machine in the UK near Ash, I'm near Maidenhead myself. Thanks for the tip on desoldering station... I'm a bit reluctant as I normally don't need to do that sort of things, especialy these days of SMT where I have all the gear already. Do you have one? any suggestions? | |
| Posted by: bibilit on 2020-05-23 09:46:02 A desoldering pump is cheap and enough for seldom use. https://www.amazon.com/Best-Sellers-Industrial-Scientific-Desoldering-Pumps/zgbs/industrial/8107034011 | |
Posted by: buserror on 2020-05-23 09:53:25A desoldering pump is cheap and enough for seldom use.I got 2 of 3 of these, I even have the 'heated tip' one... doesn't help much. I think I'll have to try the "iron heating one side of the board, pump on the oher side" and see if that helps.. | |
| Posted by: joshc on 2020-05-23 12:18:54 Nice! I was very close to buying this Mac II as I live closeby (Bracknell), I was just too stingy (not the first time). I am so happy to see you bringing it back to life. My desoldering station is this one, not had any problems so far: https://www.amazon.co.uk/gp/product/B08615ZCTV/ref=ppx_yo_dt_b_asin_title_o01_s00?ie=UTF8&amp;psc=1 | |
Posted by: bibilit on 2020-05-23 23:22:46I worked for Apple ER&D in the 90's on the Djinn and Apple Telecom 3.0 (and a few other bits)sadly most of those products had short lives, the PowerBop was poorly sold and most of them lost the wireless ability when the Bebop project was cancelled. Some were also brought back to the shop to have the wireless device removed and floppy drive butchered back into place (the bottom case is unique to this model) A couple of years ago (10 years IIRC) i met a relative, he had some friends at France Telecom, and found a full cardboard of new, unused wireless modems for the PowerBop. The Djinn was a cute project as well, i have a unit at home. To be honest internet was not a priority in France in the 90's... our Minitel system was heavily present everywhere. | |
| Posted by: buserror on 2020-06-01 00:56:53 Ok so today I did another run at the Mac II, discovered a couple of extra traces that were cut (some are quite subtle!!) near the power switch. I ended up cleaning the thru hole cap holes with the tiniest drill bits and that was a lot less stressfull than all the other attempts and methods I tried. I don't know what I'm doign wrong, but no amount of heat. So I've now reinstalled the big caps, and the battery holders. I still need to do another inspection, then wil be re-solderring the SOIC14's, then I have a couple of extra patches to add for traces that are cut /under/ these SOIC footprints, (I don't put the patch wires now as I'm going to put hot air in the area). So I'm getting there. I had a close inspection in the RAM slots and it all look clean. My worries are the areas near the Sound Chip and the GLU, and I can see a couple of traces that look 'dark' go /under/ the ICs :/ One thing: I've heard you can put the mobo thru the dishwasher to clean all the rest of the gunk that is under bits and connectors. Does anyone has done this? ie short cycle, no soap, low temperature than air compressor, then let it dry for a week, or bake it? | |
Posted by: LaPorta on 2020-06-01 00:59:53One thing: I've heard you can put the mobo thru the dishwasher to clean all the rest of the gunk that is under bits and connectors. Does anyone has done this? ie short cycle, no soap, low temperature than air compressor, then let it dry for a week, or bake it?You are opening a huge can of worms with that one. The debate on whether that is good and works, is harmful because the water is not deioniozed, or the toxins from the board will slowly kill you as you consume them from your plate in the dishwasher is raging in a never-ending battle on here. | |
| Posted by: Unknown_K on 2020-06-01 07:57:35 You also have the issue with high pressure jets blowing off capacitors with weak and rotting traces. | |
| Posted by: buserror on 2020-06-16 05:35:19 Anyway, project still ongoing, as I had quite a few other thing to do recently. However today I did 'recap' the whole board, and I just have to re-install the SOIC14 x4, then add a couple more wires (for failed traces on the pads there). I only have one worrying trace I can't do anything about unless I remove one of the 10000 pins big IC, and I won't do it unless it fails to start! I checked under the SIMMS, under the ROMs and well everywhere I could, and I hope its now acidicaly 'stable'. Also, I took the PSU appart and it genuinely look pristine, the caps have not leaked, not bulged, and it looks splendid so I think I won't recap that for now. Couldn't see a RIFA either 🙂 Anyway I think tomorrow is SOIC day, and tests. Wish me luck! | |
| 1 > |