68kMLA Classic Interface
This is a version of the 68kMLA forums for viewing on your favorite old mac. Visitors on modern platforms may prefer the main site.
| Click here to select a new forum. | |
| SE/30 Restoration Fun | |
| Posted by: chu-oh on 2019-12-04 01:53:46 Finally got my hands on a (some what) affordable SE/30, perfect recapping project for the Christmas break. The Ebay listing said it's been upgraded to have an ethernet card, 20mb of ram and a 252MB hdd. Got some pretty bad screen flicker, the floppy won't read or eject, no chime and it looks like the HDD is dead... I got it to boot once, but not since. I did get a bomb on boot once saying there wasn't enough memory but mostly I'm just getting a flashing question mark. Anyhow I thought I'd document my journey getting it up to scratch. First things first, the externals: 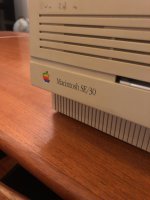 The company that did the ram upgrade... looks like they still exist: http://xyber.com.au/ 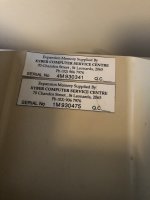 The back with the ethernet card: 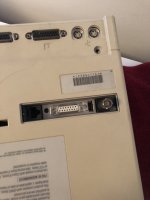 The horizontal flicker with burn in:  Weird thing, it booted to my SCSI2SD fine, but when I shut it down and came back to it about 5 minutes later the same screen was there (wasn't at all responsive):  The ethernet adapter: 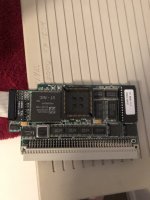 The logic board, with no sign of leaks which is a good sign. 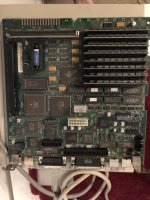 Does anyone have any suggestions on what I should do first? | |
| Posted by: Bolle on 2019-12-04 03:37:33 The flicker is caused either by a failing UE8. I had a similar looking issue on one of my SE/30 boards and it was caused by a bad trace to one of the VRAM address muxes, so that's a possibility as well. I would start with a recap and good cleaning and see where that brings you. If the issues persist tehre are two options. You can either start by checking all traces around the video circuit (especially to/from UE8 and UA8-UD8) or removing UA8-UE8 to check if the ICs itself are functioning properly. (or just go straight for replacements) I tend to check the ICs first but that's only because it takes less time to desolder them, check them in an IC tester and solder them back on than to buzz every single trace. It looks like someone did at least clean this board to some extent before. It does not show any obvious cap leakage but you can clearly see corrosion and dull solder around UD8, UE8, UF8 and even UG8. | |
| Posted by: chu-oh on 2019-12-05 01:06:18 Thanks, I've done a good clean with isopropyl and a scrub with vinegar around where you suggested and It's still occurring. So recap and report back. Thanks for your input, really appreciate it. | |
| Posted by: chu-oh on 2020-09-04 14:37:39 OK update 8 months later (I moved house, changed jobs, covid) - I've recapped the board and now it's sad chiming with horizontal stripes (same issue that @JDW had nearly 10 years ago - https://www.youtube.com/watch?v=mKJszJMRZM4). From what I can tell the issue is most likely faulty bourns filters. Does anyone have any suggestions/input on how to fix this? | |
Posted by: JDW on 2020-09-08 11:18:47...same issue that @JDW had nearly 10 years ago - https://www.youtube.com/watch?v=mKJszJMRZM4).I shipped my SE/30 motherboard to @Bolle (in Germany) and in January this year he found it was the VROM. He shipped the repaired board back to me and I can confirm his fix worked. Here's what he told me... Hm, the video ROM on your board definitely has flipped bits:  On the left is a valid dump, on the right the contents of the chip that came off your board. It looks like whenever there is a difference it's subtracted 4 from the actual value. Looks like there's a bad address input/internal addressing error or a whole cell inside the ROM went bad. Going to replace the one on your board with a spare from my stock. | |
| Posted by: chu-oh on 2020-09-09 15:25:28 Thanks! I've decided my recap job was too shoddy so I'm going to get someone else to do it then go from there. | |
| Posted by: chu-oh on 2020-09-27 18:02:51 View attachment IMG_0656.MOV 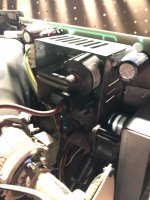 So I got the board recapped by a pro who tested it and said there were no issues. However once I got it back and plugged it in the flicking issues were still there (see video). I'm assuming this is an issue with the CRT or the flyback. Any one got any thoughts? View attachment IMG_0656.MOV | |
| Posted by: JDW on 2020-09-27 19:00:13 I hear a hard drive spinning in your videos. Power off, disconnect that, then power on. Does the display look exactly the same? Next, there is a 4-wire cable that connects the CRT to the top left of the Analog Board. With the power off, check the metal terminals inside that plastic connector to see if there is any crud or corrosion on them. Next, with the power off, remove the Yoke board on the neck of the CRT and see if there is any crud on the pins on the CRT yoke or the mating terminals on the Yoke board connector. | |
| Posted by: chu-oh on 2020-09-28 13:22:53 Thanks again @JDW. I tried all of the above with no luck but then I removed and reattached the anode cap which did the trick after adjusting it a bit. Of course I discharged the CRT before doing any of this. From what I can tell the machine was used for bookkeeping in Mount Isa Queensland at least until 2000, so the machine would have been used in really hot conditions for years on end. Unfortunately this has meant that the anode cap plastic has gotten so hot for so long that it's very dirty and sticky. Any suggestion on cleaning it? Or is it something I should just leave? | |
| Posted by: karrots on 2020-09-28 14:14:57 A little IPA will clean that off. It's common for those to get sticky. In theory you'll want to reaply some dielectric grease or paint around the edge to prevent arcing. | |
| Posted by: JDW on 2020-09-28 14:23:11 Don't clean it off, neither the suction cup or the red paint on the CRT. Why not? For the very same reason that red paint is on there in the first place. A sticky cap will repeal the arcing more than a dry cap, with or without the red paint on the CRT. | |
| Posted by: chu-oh on 2020-09-28 21:10:16 Ok I'll leave it be, thanks. In other news I've pulled the floppy drive apart, given it a clean, replaced the broken gear and added some lithium grease and it's working fine. So that's another thing fixed. Only thing I need now is a CRT now hopefully something will pop up on ebay soon. | |
| Posted by: mitchW on 2020-09-30 11:12:21 I would also go and replace capacitor C15 in some near future. But use a different one, use a foil style cap 3.9uF 100V. It is described on page 159-160 of the Larry Pina's book The Dead Mac Scrolls. | |
Posted by: JDW on 2020-09-30 11:51:36I would also go and replace capacitor C15 in some near future.Use a film cap as mentioned in my older post here: I demonstrate that 3.9uF film cap in great detail in my SE/30 Analog Board Recapping Video. | |
| Posted by: chu-oh on 2020-10-02 08:32:31 So another issue has popped up - no audio out of speaker except for faint crackling (head phone port works fine). The person who did the recap confirmed the speaker was working when they tested so I'm thinking it's a psu/analog board issue. I've tested with my LCIII speaker which didn't work either so it's not an issue with the speaker. Any thoughts on how I should troubleshoot this? | |
| Posted by: LaPorta on 2020-10-02 09:27:56 Do you have a separate speaker you can hit wire to the terminals and see if it works? It could be the speaker itself (though usually they are rock solid). You can also see if any solder joints at the speaker terminal are cracked or intermittent. | |
Posted by: chu-oh on 2020-10-02 09:44:45Do you have a separate speaker you can hit wire to the terminals and see if it works? It could be the speaker itself (though usually they are rock solid). You can also see if any solder joints at the speaker terminal are cracked or intermittent.I've tried the LCIII speaker, but I might reflow the speaker header joints just to check. | |
Posted by: JDW on 2020-10-02 10:03:09I've tried the LCIII speaker, but I might reflow the speaker header joints just to check. You should. Because if the headphone jack audio is fine, as you said, then I don't see how it could be an Analog Board problem. After desoldering that 2-pin connector, make sure there is no corrosion on those 2 pins on the motherboard or in the mating connector coming from the speaker. If all that doesn't work, it's more likely a trace on the motherboard is mostly eaten through, as opposed to a bad speaker. | |
| Posted by: chu-oh on 2020-10-02 10:42:32 Thanks again JDW. I removed the header and soldered a speaker to the board and I'm getting the same issue. The person I got to do the recap has offered to have another look so I might just do that, just annoying to have to post interstate. | |
| 1 > |