68kMLA Classic Interface
This is a version of the 68kMLA forums for viewing on your favorite old mac. Visitors on modern platforms may prefer the main site.
| Click here to select a new forum. | |
| AppleCD Plus M3021 won't mount cd's and cd-roms | |
| Posted by: bushok on 2018-02-13 11:11:53 Hi, my AppleCD SC Plus (M3021) is unable to mount cd's or cd-roms. It is hooked up to a Macintosh IIfx with OS 7.5.3, has the proper installed software and is (I think) neatly terminated in the right manner (it is the only externally installed SCSI-device and has the terminator in the upper SCSI-slot, and the SCSI-cable which is connected to the IIfx in the lower SCSI-slot). The CD-ROM drive (which is actually a Sony device) is shown with ID 3 among other SCSI-devices, the harddisk and the CPU (please see pic below). When I insert the cd-caddy loaded with a cd or cd-rom, it starts humming a bit, it pauses, it hummes a bit again and then it ejects the cd-caddy... What could be the problem? Is it a dirty laser or is it more serious? Thank you for helping me out! 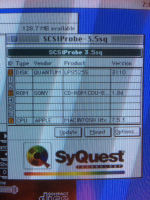 | |
| Posted by: techknight on 2018-02-13 14:52:02 bad optical pickup/laser assembly. Its quite common especially if its been used and used and used into the ground. you could try cleaning the lense but I dont think thats going to help. You will need to kick up the laser output power a tiny bit but it was accelerate the wear. | |
| Posted by: archer174 on 2018-02-13 15:20:24 It could be the laser, but I think is more likely caps on the logic board. See my guide here: http://www.asterontech.com/Asterontech/next_cdrom_refurb.html | |
| Posted by: techknight on 2018-02-13 18:55:15 Bad caps are possible, but with all of the CD drives I own and used to own, I have never had to change the caps yet. or spot any signs of leaking. But it could be this particular model of drive thats affected, I dunno. I have never seen a 1X drive. everything I had ever owned or currently own has been 2X and faster. My gut feeling from years and years of repair experience is the laser assembly. | |
| Posted by: archer174 on 2018-02-13 20:02:43 I've done about a dozen of these and only had one bad laser assembly so I guess I'm bias in the other direction. The good news is it only takes a few minutes open it up and confirm. | |
| Posted by: bushok on 2018-02-13 22:39:11 Hi techknight and archer174, thank you for your replies and insights! I am not a technician I'm afraid (although I can mend a few things 🙂. How do I see that the laser assembly is not ok anymore? Replacing this item will not be possible anymore, since the device is 25 year old I guess? | |
| Posted by: bushok on 2018-02-13 22:46:01 This is what I found in the Apple Service Source document of this device (http://tim.id.au/laptops/apple/misc/applecd_sc.sc_plus.pdf): (Troubleshooting/Symptom Charts - page 2) : "Red LED does not light when you insert the caddy 1 Exchange drive mechanism. 2 Exchange LED board. 3 Exchange power supply." The red light does indeed not light. It is very probably not the LED board and it is not the power supply. That leaves the drive mechanism (or capacitors) as faulty, as you guys said. I will open the thing up shortly and post photos here! | |
| Posted by: bibilit on 2018-02-14 02:13:24 I agree with Archer, capacitors, i have repaired a few of them, same problem your description. around 10 capacitors to replace and will probably work again. | |
| Posted by: bushok on 2018-02-14 07:23:43 I've opened the CD SC Plus (a hell of a job!). I have not managed to get the plugs out of the Logic-board, they are mighty stuck and I've read about how vulnerable they are. When I look at the back of the Logic board, I see a few very slight corrosion marks. Does anyone of you @bibilit @archer174 recognise it as the capacitors being the problem? BTW, the laser lens looks nice and clean. @techknight How do I know the laser assembly is the problem? 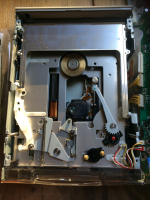 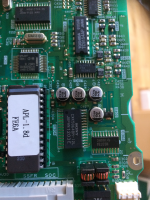 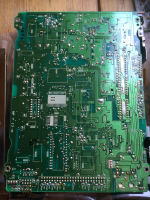 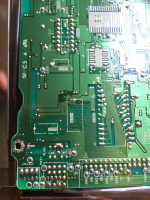 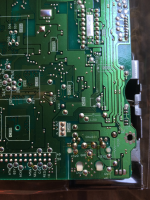 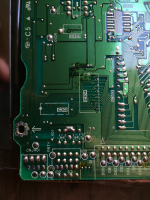 | |
| Posted by: bibilit on 2018-02-14 07:51:10 Those 100 µf 6.3 volt capacitors (the second picture) and on the same side of the board, a set of 47 µf 16 v and 10 µf 16 v on the opposite. Capacitors are leaking for sure. I replaced capacitors a week ago (AppleCD 150, same drive and board) before the process, the disk was ejected after a spin. Now is working flawlessly. 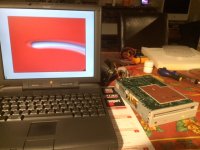 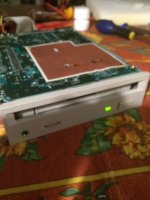 | |
| Posted by: archer174 on 2018-02-14 11:22:59 Yeah, the black discoloration on the back side is due to the capacitors leaking. The board otherwise looks in OK shape, so you probably have a high chance of success. | |
| Posted by: bushok on 2018-02-14 11:34:59 @archer174 Ok, that’s good news. I do have great difficulty in loosening the yellow wired cables from the Logic board. I don’t want to damage the cables and sockets. What should I do best? | |
| Posted by: bushok on 2018-02-14 11:41:43 Here a photo of all the cables connected to the Logic board. The left plug was the only one I managed to unplug. A bit strange though: the golden fingered flat strip just slid out of the plug… All the other plugs I just could not get loose. Unbelievable how stuck they are! What’s the clue?  | |
| Posted by: archer174 on 2018-02-14 13:37:39 The flat ribbon cable is the only one to be really concerned with breaking. The yellow cables just use a firm grip and rock side-to-side a bit. | |
| Posted by: techknight on 2018-02-14 14:57:06 Wow, first time I have seen CD drives leaking caps. But I guess thats to be expected at this point. | |
| Posted by: bibilit on 2018-02-14 23:57:01 The drive back in the enclosure (the 150 was bought to repair a faulty CD SC Plus)  | |
| Posted by: bushok on 2018-02-15 01:11:37 I've managed to unplug the plugs from the Logic-board. It is clearly to see that there is corrosion (the light brown 'heaps' around the capacitors), see my picture. Two questions: 1. I've also made a picture of the 'orange-brown golden fingers strip' that just slid out of the plug when I lift it a bit from its socket on the Logic-board. The strip has some 'bleeding' on or in it...would that be a problem? 2. I am no expert in replacing capacitors, this will be my first time. Is the soldering iron in the picture good enough to do the job? And should I start at the back of the Logic-board to loosen the old capacitors? 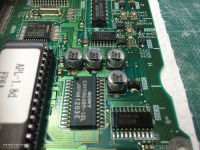 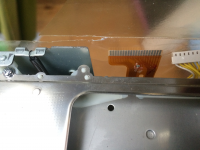  | |
| Posted by: Daniël on 2018-02-15 01:51:47 The iron should be OK for removing the old capacitors, you might want to grab some flux and solder braid to remove the old solder. With these SMD capacitors, heating up the other side is not needed as the solder joint is mounted on the surface of the PCB, hence the name. However, should you have any difficulties doing this repair, I'm more than happy to lend a hand. I have a hot air soldering station, which makes replacing SMD caps a breeze. I'd gladly replace the caps for you if you want, I just am waiting on some solder paste to come my way from the slowboat from China, then I should have everything needed for a simple recap job. I'm going to have to do some recapping on my Macintoshes soon, I've started out with my iron on my SE/30, but got really frustrated at how hard it is to solder the caps down due to the small leads. Having practiced a bit with my hot air station, removing the caps without damaging the board so far has been really easy, and soldering new caps back on should be just as easy. | |
| Posted by: bibilit on 2018-02-15 06:22:44 I will cut the capacitor first (plenty of information online) and get rid of the remaining soldered legs. | |
| 1 > |