68kMLA Classic Interface
This is a version of the 68kMLA forums for viewing on your favorite old mac. Visitors on modern platforms may prefer the main site.
| Click here to select a new forum. | |
| Caps! -- (Supplies For Beginners) What do you need? | |
| Posted by: uniserver on 2012-12-09 11:04:15 Basics for first time cap job: http://www.radioshack.com/product/index.jsp?productId=3932529 4.5" Mini-Diagonal Cutters Model: 6400061 | Catalog #: 64-061 $7.49 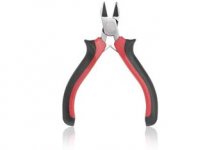 http://www.radioshack.com/family/index.jsp?categoryId=2032313&allCount=212&s=A-StorePrice-RSK&fbc=1&f=PAD%2FProduct+Type%2FSoldering+irons&fbn=Type%2FSoldering+irons&filterName=Type&filterValue=Soldering+irons Model: 64-2051 | Catalog #: 64-2051 15-Watt Soldering Iron with Grounded Tip is an ideal choice for integrated circuit work. Price: $8.99 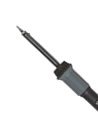 http://www.radioshack.com/product/index.jsp?productId=12582876 NTE 83-1018-0186 186-18 Rosin Liquid Flux Pen® Model: 83-1018-0186 | Catalog #: 55047965 $8.71 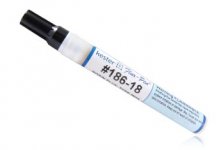 http://www.radioshack.com/product/index.jsp?productId=2062717 High-Tech Rosin Core Silver-Bearing Solder (1.5 Oz.) Model: 64-013 | Catalog #: 64-013 $7.49 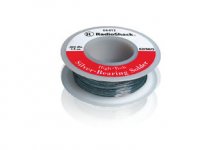 Hopefully you will not have to use this, but you should get some just incase, for bad traces. http://www.radioshack.com/product/index.jsp?productId=2062641&retainProdsInSession=1&znt_campaign=Category_CMS&znt_source=CAT&znt_medium=RSCOM&znt_content=CT2032227 50-Ft. White Insulated Wrapping Wire (30AWG) Model: 278-502 | Catalog #: 278-502 $5.49 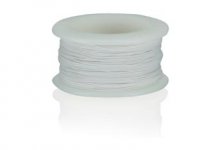 With these basics you should be able to reasonably complete a complete a cap job. There is 3 different methods to remove old caps: 1. You can desolder them, in the wiki they talk about using 2 soldering irons one on each side of the cap to remove it. 2. You can cut the cap as close to the bottom with nippers and then pull off debris and then desolder the leads individually. 3. My favorite, Twist them off with some small electronics needle nose pliers, and just leave the (flush) portion of the lead remnants on the pads. To install the caps: 1. Clean the pad/pad area if there is any electrolyte goo from old leaky caps, to remove pad corrosion (if any) some use standard #2 pencil eraser 2. Flow some solder into the pads 3. Flux pads 4. Place part 5. Flow each side to make a nice solid mechanical and electrical connection done. | |
| Posted by: MinerAl on 2012-12-10 08:06:31 Seems as good a place as any to ask... Could we have a sub-forum (or actual forum) with all of these Caps! threads consolidated into it? Seems like great information is strung all over the boards. Just a thought. | |
| Posted by: LOOM on 2012-12-10 08:29:50 What is the purpose of the Flux ? I've seen it mentioned it every time, but no explanation on what exactly it does. Or if it's actually needed. I've never used it when soldering stuff. | |
| Posted by: uniserver on 2012-12-10 08:41:32 oh man the Flux… I know what you are saying, Why? Because flux is already in the solder right? Especially when you get into rework, the flux just makes the solder flow and ball up like liquid mercury, also it can help you if you are trying to get your way out of an accidental solder bridge. It just makes your life easier. Post Consolidation: If you look at the top of the first page of the this post you will see most of the recent cap posts there. Capacitor Replacement Thread . . . http://68kmla.org/forums/viewtopic.php?f=29&t=19596 | |
Posted by: Trash80toHP_Mini on 2012-12-10 10:33:05Could we have a sub-forum (or actual forum) with all of these Caps! threads consolidated into it? Seems like great information is strung all over the boards.Great ideas, a general maintenance forum would be ideal, as it stands all the general application maintenance info is scattered about the model specific fora in posts about specific troubleshooting/repair sessions. * Not everyone has all the pertinent hardware repair books available to them. In that first post of the Capacitor Replacement Thread . . . . . . you'll find an appeal for all members to post replies in that thread with links to any unlisted posts they might discover. [😉] ]'> * Unless someone wants to re-write all that info scattered about the MLA, several TOMES of model specific info as compared to that handfull of general reference books, I don't wanna hear anything about how the WiKi would be remotely suitable for this kind of project. New recruits post questions,and members help them, and each other, out in these threads. The discussions bring amazing, tangentially related bits of information out of the woodwork that leads to more threads being started as follow up . . . ad infinitum. Thread linked: Capacitor Replacement Thread . . . | |
| Posted by: mcdermd on 2012-12-10 12:26:21 I don't use flux for recapping unless something isn't right. It helps heat the area more quickly and evenly. I've found it makes more of a mess than anything else and is unnecessary if you've got a clean, tinned surface to work with. It may be of more use with non-temperature controlled soldering pencils, though. | |
| Posted by: uniserver on 2012-12-10 12:47:15 yes lol… how much was your pro soldering station? | |
| Posted by: trag on 2012-12-10 16:05:04 Flux serves two purposes, which ultimately, make things easier. First, the flux combines with oxygen (burns) near the metal. Since the flux is more attactive/reactive than the metal it prevents the metal being worked from oxidizing. All the oxygen involved ends up burning off with the flux. If you run out of flux, or try to resolder an existing joint without supplying new flux, you will usually end up with a dull looking poor joint, which is oxidized. Second, flux helps the heat conduction in the same way that heat sink grease does. The contact between the soldering tip and the metal is usually a tiny surface area. Maybe one or two little points that happen to intersect. This can make it very difficult to heat the work. Tinning your soldering tip helps with this, but the tinned tip can oxidize after a while. Using plenty of flux in your work helps even more. Ultimately, you're much better off using lots of flux and making a mess than using too little and getting a poor solder joint. Of course, just the right amount is even better, but erring on the side of excess is better than erring on the side of insufficient. Flux is also extremely useful when desoldering. Existing solder joints don't contain flux (if they were done right) and you aren't supplying any with new solder. So adding flux is almost a necessity to get the solder to melt and run properly when desoldering. No matter how much flux you use, you should clean your work thoroughly when you're done soldering. Left over flux can be corrosive. I prefer this: http://amzn.com/B004RIF3BM  | |
| Posted by: dougg3 on 2012-12-10 16:41:10 I just wanted to 100% agree with trag's advice about flux. I'm fairly new to soldering, but my experience is it never hurts to add flux (as long as you clean it afterward if it's corrosive and/or conductive) and it always makes soldering easier. I try to use no-clean flux so that there's no risk of future damage though (but I still clean it off afterward). Generally if I'm soldering something like a through hole component, the solder I apply contains enough flux to do the job and I don't have to add extra flux if I don't want to. Even when I solder a surface mount capacitor or resistor it usually works fine too--but the soldering process is much easier and quicker if I add some flux first, so I generally add it anyway. If I'm doing something smaller scale (like soldering a small chip with tiny closely-spaced leads into place), I *have* to add extra flux before soldering or else it will be nearly impossible to get the solder to flow and even when it does, there will be bridges across the pins. The moral of this story: if in doubt, use flux 🙂 | |
| Posted by: mcdermd on 2012-12-10 17:04:14 So basically, I'm not wrong when I don't use flux when I recap boards? | |
| Posted by: olePigeon on 2012-12-10 18:10:42 I really, really like solder paste. Just put some goop on the pads, stick the cap in it, then hold your soldering iron in the goop. Super easy. | |
Posted by: dougg3 on 2012-12-10 19:04:20So basically, I'm not wrong when I don't use flux when I recap boards?I would say that's correct 🙂 it might be slightly easier to solder with more flux, but if it works for you without the extra flux, I don't think you're doing anything bad. I tend not to use more flux when I do through-hole stuff and it works out OK. | |
| Posted by: tt on 2012-12-10 21:57:54 Solder wire can often include some flux in the core and solder paste usually uses flux in the binder. Extra flux can definitely help in a situation where you are getting poor flow between parts. I was doing some soldering earlier today that was going nowhere until I grabbed a bottle of flux. I try to use a fan or use other ventilation when using flux (or soldering in general). If you do a lot of soldering there are smoke absorbers (fan with a filter) that help suck the air away from you. | |
| Posted by: uniserver on 2012-12-10 22:05:39 I happen to use the same flux bottle that trag suggests, I'v had mine since 2006. 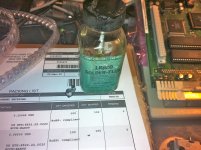 | |
| Posted by: uniserver on 2012-12-10 22:22:31 + Its always fun telling people to go FLUX them selves. I used to work with engineers all day... They use to tell me that when I found issues with the new PCB in my testing, All in good humor of corse. 😱) Many moons ago, I worked for a company called Ensure Technologies, they made a product called xyloc, it was a Proximity Based, PC-Wireless Security system. Back in 1999 everything was 100% made here in us, PCB, Plastics, etc, a little later they decided to go china, and never look back. I started in the product testing / Re-Work dept. After the whole China move, I ended up doing tech support for a while, not too much after I quit to sell computers and survive on my own (very risky yet very rewarding).  | |
| Posted by: uniserver on 2012-12-11 13:14:45 Also, I find it quite useful if you are ambidextrous with your soldering iron and your pliers. | |
| Posted by: beachycove on 2013-02-03 18:01:27 Question for Uniserver: Further up this thread you talk about twisting capacitors off with pliers. I don't know if this was covered elsewhere, but I am curious about this, so could you explain that? How much twist and how often — is the point to rip the things off or to break the wire legs, or what? Does it lift traces from time to time? | |
| Posted by: uniserver on 2013-02-03 19:46:13 Yes, In my opinion there is NO other way to remove the capacitors. I pinch them with some small electronics needle nose pliers, and twist about one and a half turns and it most of the time pulls the leads right out of the cap. Other times it breaks the lead off right at the pad. Either way works out just fine, If it pulls the leads out of the cap, Then I just move the lead one by one back and forth about 4 times and it will snap the lead off at the pad. Then I neatly remove little plastic base with the 2 broke leads in it, into my little trash bucket i have on my desk. I then clean the pad, has to be done, there is no shortcut. Then quickly add a little solder each pad, then with solder wick, it sucks everything off the pad nicely including the lead bit. Now you have like brand new, clean pads to work with. Never had one lifted pad doing it this way. I've repaired MANY boards for/from people that have tried it other ways however. I'm not knocking any other way, I have a sort of production environment here... Do it any way you want, if you mess it up, no problem, send it to me and ill fix it for you. Charles If anyone that is not a member of this forum, and you would like me to Re-Cap your board for you, you can contact me at: iamcapsmack@gmail.com | |
| Posted by: mcdermd on 2013-02-03 22:08:12 I'll be the voice of terror and say I've ripped a corroded pad off by twisting. I'm a cut-and-pull guy now. Then there's the other school that says the only want to do it is with two soldering pencils and no twisting or pulling. Short answer: try out the twist method (or any other method you haven't tried before) on something you don't care about first. | |
| 1 > |