68kMLA Classic Interface
This is a version of the 68kMLA forums for viewing on your favorite old mac. Visitors on modern platforms may prefer the main site.
| Click here to select a new forum. | |
| Capacitor Replacement Thread . . . | |
| Posted by: Trash80toHP_Mini on 2012-11-08 09:46:01 Since so many troubleshooting threads wind up like this: http://68kmla.org/forums/viewtopic.php?f=8&t=19583 An official detailed recapping guide for every model would be an excellent thing to have in the Hacks & Development forum. I know we have some already, but I'll have to think about some sort of formatting for entries. I'll start with one of the boards I need to tackle first, Im thinking along the lines of having a pic of the MoBo with info boxes, witnesse lined to each cap on the board and a netlist of caps . . .(Obligatory) Disclaimer: the information linked to, and crosslinked from, this thread is a WORK IN PROGRESS and care should be taken in determining which parts and methods are chosen for each and every recapping project. Clarification: This thread is not the aforementioned . . . official detailed recapping guide for every model . . . by any stretch of the imagination. Consider it as the very first baby step headed in that direction. As suggested, developing a set of definitive WiKi articles would be the most desirable outcome for this project. OUTRIGHT WARNING! I certainly have no clue about what I'm doing in this regard at this point: so this thread is dedicated to those in the same lifeboat and the effort to reach dry land. The only advice I'm equipped to give in this thread: Have somebody with a clue do the recap for you! < . . . considers admitting that he rarely follows his own advice . . . :-/ > Be that as it may, here goes: PLEASE post any applicable links to the pertinent threads which have already been started. I'll edit them into the listing here as a jump off point. --------------------------------------------------------------------------------- I've been following developing info in trag's capacitor shop for some time now. Recapping Analog Boards of 128K/Plus and SE series Compact Mac Analog Board Re-Cap Kit? Pro tip for recapping boards - with tool recommendations. Caps! -- (Supplies For Beginners) What do you need? Caps! - Temp Controlled Soldering Irons - On A Budget! Caps! -- LC TDK Power Supply FIX For (Pizza Box Mac's) ________________________________________________________________________________________________________________________________ Capacitor Technology threads: Multilayer Ceramic Capacitors MLCC - SMD/SMT ________________________________________________________________________________________________________________________________ Compacts: -128k -512k -512ke -Plus Caps! -- Macintosh Classic Caps! -- Macintosh Classic II Caps! -- Macintosh Classic II Rev. 2 (Enhanced Sound) - - Neither here nor there: Apple Macintosh SE/30 Capacitor Replacement, Pinouts and Information Caps! -- Macintosh SE/30 Gamba: se30repair - Caps! -- Macintosh Color Classic - - MacII Series/68030 NuBus Architecture -Mac II -Mac IIx Caps! IIcx -- IIci Caps! Macintosh IIci - Cache Card -Mac IIfx Caps! -- Macintosh IIsi (NuBus/PDS Hybrid) _____IIsi Sony PSU trickle current startup -Mac IIvx - 68020/68030 PDS derivatives of the NuBus/PseudoSlot Architecture Caps! -- LC I / II / III - Caps! -- LC 520 -MacTV Caps! -- LC 550 - - Quadras/68040 Architecture: Caps! -- Macintosh Quadra/Centris 610 -Quadra 700 -Quadra 800 -Quadra 900 -Quadra 650 -Quadra 950 -Quadra 840av - - -Quadra 610 (NuBus/PDS Hybrid) -Quadra 660av (NuBus/PDS Hybrid) - - 68040/bridged 68030 PDS derivatives of the NuBus/PseudoSlot Architecture Caps! -- LC 475 / Quadra 605 - -Quadra 630 - - - - - Caps! -- LC 575 a.k.a. Performa 575, 577, 578 -LC 580 - - Luggable thru PowerBooks: Caps! -- Macintosh Portable -PB100 - - - - PPC . . . fuggedaboudit! xx( Last edit: 2/25/2012 | |
| Posted by: Trash80toHP_Mini on 2012-11-08 09:47:22 Formatting tests: I really like the individual pics of components that are cropping up. A table of DigiKey/North American, ____?____/AUS, ____?____/EEU order numbers/quantities/descriptions/pictures would be most excellent. Nicely done visual documentation: Caps! IIcx -- IIci | |
| Posted by: Trash80toHP_Mini on 2012-11-08 09:48:08 placeholder | |
| Posted by: uniserver on 2012-11-08 10:25:55 I would like to help with this if at all possible, However I am confused as to what i am suppose to do. | |
| Posted by: Trash80toHP_Mini on 2012-11-08 10:41:22 That's what we're going to figure out first. Start by searching out all the good threads related to re-capping, post'em and we'll get started from there! [😉] ]'> The A/B recap thread is close to what I'd like to see. The only thing missing, from a cursory look see, is the MoBo shot with arrows/info boxes aimed at every cap. | |
| Posted by: Mk.558 on 2012-11-08 16:55:25 viewtopic.php?f=7&t=18835#p177792 By diagram, you mean like this? EDIT: Seems the diagram has some additional compression artifacts that weren't present awhile back...oh well on the other link in my signature there is a link to the AppleWorks version. | |
| Posted by: Trash80toHP_Mini on 2012-11-08 19:36:20 Thanks for that removal link, that was one of the ones I wanted to get posted. I like your diagram, but it's a little more intimidating than what I was thinking because of the information density and presentation. I'll play a bit in illustrator and post something. | |
| Posted by: Mk.558 on 2012-11-10 20:46:38 Well yes, I will confess that the image is quite crammed and a bit on the "unprofessional" side...not to mention the load of color will guarantee a well-soaked page fresh out of the inkjet...Looks great on the computer screen, rubbish on paper (I personally have never printed it). As I lack the skillset to make professional-grade material, it's the best I can do, and I was originally trying to make it fit on a Letter (US) size page, but I was eventually forced to go with Legal. Maybe two A4 pages would be better? Certainly, anybody is free to download the AppleWorks version (or if you don't have it, I can cut all the text out of it for you, and pluck out the raster images if need be) and improve upon it. The only thing is that the logic board image comes from JDW so permission from him would probably be respectable. | |
| Posted by: uniserver on 2012-11-25 14:57:50 you should at the top post links to commonly needed caps like from digikey: 16v 47uf 16v 10uf 16v 1uf the panasonic, +/- 20% OEM replacement alum can types and the tantalum kind Mcdermd knows exactly the ones. also these as well just not as many as above. 16v 220uf 16v 470uf 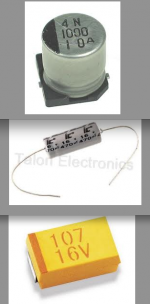 | |
| Posted by: Bunsen on 2012-11-27 00:25:01 http://www.badcaps.net/ NB: not an endorsement from me of either the information or the sales from this site; just looks useful. | |
| Posted by: phreakout on 2012-11-27 08:28:57 Trash, For those needing further detailed diagnoses, would posting the entire schematics of a machine be allowed as well? I've got a backup of the entire blueprints for the SE/30 if you'd like. Not sure if it would violate 68kmla post policy, though. :-/ 73s de Phreakout. :rambo: | |
| Posted by: tt on 2012-11-27 09:50:34 I am a proponent of polymer SMD caps that look like the original *evil* caps }🙂 . I wanted to keep my logic board (socketed) looking closer to stock and I also read here about tantalum caps potentially having catastrophic failures. I posted the part numbers I used here: viewtopic.php?f=7&t=18318#p173029  | |
| Posted by: uniserver on 2012-11-30 09:06:01 Here is my suggestion for badly corroded cap jobs, Again this is my suggestion, might not be yours, just sharing from my hands-on experience. make sure when you do the se/30 that you just don't mess around and twist off the old caps, don't try to heat them up and remove.. just twist the bastards off, if you lift a pad doing it , it was going to happen anyways. but unless they are mostly corroded off, you will not have any issues with pads. if you have a buffer wheel for your dremel its good to polish the pads once you twist them off, it gets the corrosion from the leaked electrolyte, makes better contact with the soldering iron. makes your life way more easy when putting the new ones back on. Flux always helps the solder flow it helps make your life easier. | |
Posted by: Trash80toHP_Mini on 2012-11-30 10:30:07. . . Not sure if it would violate 68kmla post policy, though. :-/Nice! That's a wonderful offer and very nicely done in terms of restraint in waiting for approval, comrade. I'll defer judgement on that issue to Joint Force Command. It will likely boil down to whether this is a reverse engineered schematic or one smuggled out of the Infinite Loopiness, carrying Intellectual Property Notice/Copyright baggage along on its underground railroad ride. Forward the relevant info on this issue to Cory in PM for determination and all remains cool. :beige: | |
| Posted by: phreakout on 2012-12-01 00:20:09 Um, on second thought, possibly not. After looking through the GIFs of the schematics, they do show " Apple Computer, Inc." in the lower right-hand corner of each page. It doesn't appear to be a reverse engineer from a 3rd party, like Bomarc Services (http://www.bomarc.org). They currently have both the logic board and analog board dissected and recompiled into their own schematics. 73s de Phreakout. :rambo: | |
| Posted by: Trash80toHP_Mini on 2012-12-01 08:23:11 Thanks for checking for Intellectual Property notification and for that Bomarc Services link. I remember seeing some of that contraband posted somewhere on the web. You're right, it's best to leave that kind of info floating on the breeze in the clouds rather than posting it here. Any direct linkage would clearly violate the rules and be shot down immediately. | |
Posted by: phreakout on 2012-12-01 11:08:21Here is my suggestion for badly corroded cap jobs,I agree. Although, I am finding that it may be better to try cutting the old caps off, like what Mk.558 has posted. If you have a buffer wheel for your dremel its good to polish the pads once you twist them off, it gets the corrosion from the leaked electrolyte, makes better contact with the soldering iron. makes your life way more easy when putting the new ones back on.I agree as well. But to be more gentle on the board, use a small wire brush kit like this. Not saying to get that exact kit, but one similar to it. That one I posted is uber weak; no stiff strands of wire in that brush, compared to the previous model kit they carried. 😛  Also doesn't hurt to use a pencil eraser as well. Also doesn't hurt to use a pencil eraser as well.73s de Phreakout. :rambo: | |
| Posted by: tt on 2012-12-01 11:37:55 "Don't copy that floppy or twist that cap." I had some corroded pads that made it difficult to remove the remaining legs after doing the cut method. Covering the area with a flux pen and applying heat from the iron cleaned it up pretty well. Be gentle and let the heat and flux do the heavy lifting. | |
| Posted by: uniserver on 2012-12-01 15:35:33 I found this at microcenter today, 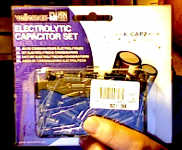 they have a new section over in the Gamer section, all kinds of stuff, its like how radio shack used to be. In this kit there is enough to do almost do 2 boards, maybe 3 boards depending on the board (all caps). Obviously at 21 bucks its not that great of a deal, but its light years better then $1.67 a cap at RadioShack aka worst buy express. and microcenter is open till 9 or later at most locations. 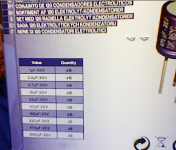 | |
| 1 > |