68kMLA Classic Interface
This is a version of the 68kMLA forums for viewing on your favorite old mac. Visitors on modern platforms may prefer the main site.
| Click here to select a new forum. | |
| PB 5xx original AC adapter re-cap & modern replacement | |
| Posted by: 3lectr1cPPC on 2023-07-20 13:50:19 I’ve begun and I’ve got questions. I went ahead and desoldered all the wires from the 5xx PSU. There are a total of 5. Red Orange Blue Thin Black Thick Black Red is VBATT Orange is VMAIN Think black and blue are both ground Thick black is not common with any of the pins on the 5xx connector but was soldered common with the thin black on the vertical PCB. So I’m thinking - Red and orange soldered together and wired to + on the barrel connector Thin black, blue, and thick black soldered together and attached to negative on the barrel connector. @Fizzbinn - is this what you did? 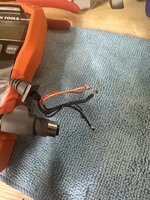 | |
| Posted by: mustagcoupe on 2023-07-20 13:52:30 Thick black should be shield which is connected to the metal shell around the tip of the connector. It should be tied to negative. | |
| Posted by: 3lectr1cPPC on 2023-07-20 13:55:24 Oh that’s a good point, I’ll tone that out and see. | |
Posted by: Fizzbinn on 2023-07-20 14:42:23Red and orange soldered together and wired to + on the barrel connectorYep! 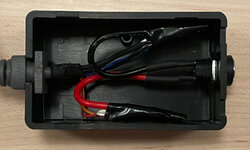 | |
| Posted by: 3lectr1cPPC on 2023-07-20 14:43:23 Ok great! I’m gonna go do that now and then we’ll see if I can manage to not blow up my 540c along the way. | |
| Posted by: 3lectr1cPPC on 2023-07-20 15:41:55 It works! 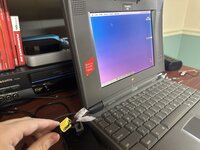 It’s a bit messy looking at the moment as I don’t have any heat shrink or a fancy box to mount everything in it, but the thing works! Should finally be able to run these laptops for as long as I’d like to. Will tidy things up later when I get the tools. Thank you all for the help in getting this fix put together! | |
Posted by: Fizzbinn on 2023-07-20 15:48:26It works! Woo-hoo! If it works it works! | |
| Posted by: 3lectr1cPPC on 2023-07-20 15:52:12 Nothing more permanent than a temporary solution that works, right? Seriously though, I will clean it up at some point. I’d love to make it look as nice as yours does. | |
| Posted by: 3lectr1cPPC on 2023-07-20 19:38:49 Well the tunnel vision’s gotten worse  | |
| Posted by: 3lectr1cPPC on 2023-08-06 14:17:56 Just put out a full edited video on building mine, hopefully it can be of some use to others who are building one of these: | |
Posted by: jmacz on 2023-08-06 22:33:18And this is what it looks like all put together: @Fizzbinn this power supply you got, did it have a 2 prong or 3 prong plug? It‘s encased in plastic so doesn’t matter but the original was 3 prong so wanted to check. I have not opened up my brick yet but did the original power supply have the 3rd prong connected to the cable shield or was it disconnected? | |
Posted by: Fizzbinn on 2023-08-07 08:31:30@Fizzbinn this power supply you got, did it have a 2 prong or 3 prong plug? It‘s encased in plastic so doesn’t matter but the original was 3 prong so wanted to check. I have not opened up my brick yet but did the original power supply have the 3rd prong connected to the cable shield or was it disconnected? Two prong: 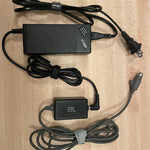 Parts I used: Checking a working original PS, yes the AC input ground is connected to the DC output connector shield. | |
| Posted by: jmacz on 2023-08-07 08:35:25 Ok thanks. I might be tempted to try picking up two smaller 16V 2A power supplies and merging them into a single case. That way I have two separate 16V rails each at 2A like the original. I know we have not yet figured out whether a single 16V 4A+ supplying both Vmain and Vbatt will work with a real battery inside, but I might try this as another variant for testing purposes later. | |
| Posted by: jmacz on 2023-08-08 08:41:43 Power supplies arrived this morning. Each one is 16V @ 4A. I placed them next to an ADB mouse for size comparisons. I'm curious how much space they are actually taking up within the plastic enclosure and whether I can fit both inside the stock power supply casing. 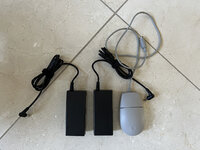 Again, probably overkill given I would think a single 16V @ 4A could handle both Vmain and Vbatt but let's see how it goes when I eventually (hopefully) get to the battery rebuild. | |
| Posted by: jmacz on 2023-08-10 18:07:44 Been tinkering with a few things this week. 😎 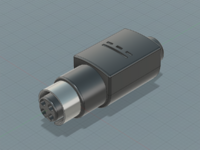 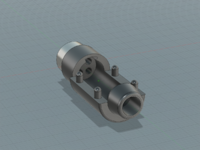 First attempt at a print via 3D resin printing. 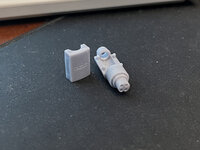 And then for the outer shield: 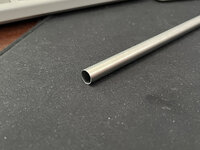 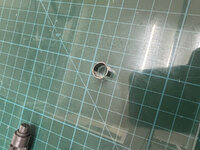 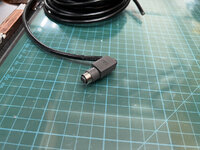 It fits well inside the power port of my PB540 so far. But it was with the motherboard out and I have not yet tried it with the case installed. But the model still needs some work as it's too hard as is to solder a wire onto the metal outer shield for grounding. I need to make it easier. The design is meant to take four of the crimp pins that @Fizzbinn found on Amazon. And takes a 5 conductor cable (one for each of the four pins and a 5th for the ground shield). If I get this working, I will post the STL model as well as the parts I used to make the shield. | |
| Posted by: 3lectr1cPPC on 2023-08-10 18:27:48 You mad genius. This is amazing! If you can get this working (and I have no doubt that you can), no one would need to even own any 500 series supply to pillage the connector from in order to build one of these. | |
| Posted by: croissantking on 2023-08-10 19:28:56 This is fantastic work. Props to you sir. | |
| Posted by: Iesca on 2023-08-10 20:47:54 Great job @jmacz! | |
| Posted by: MacUp72 on 2023-08-10 23:58:25 wow, looks good.. even better than my improvised solution of page 1.. | |
| Posted by: Fizzbinn on 2023-08-11 09:32:11 Wow! Awesome work @jmacz ! | |
| < 6 > |