68kMLA Classic Interface
This is a version of the 68kMLA forums for viewing on your favorite old mac. Visitors on modern platforms may prefer the main site.
| Click here to select a new forum. | |||||||||||||||||||||||||
| Schrockwell's S3/30 Reloaded build | |||||||||||||||||||||||||
| Posted by: schrockwell on 2025-11-29 05:57:35 I don't want to jinx it, but we are nearing the home stretch here. I took the board to a friend who has a large ultrasonic bath. It was disgusting. You could watch the flux flow out from the PLCC chips in big strands (see second pic). I'm happy to report that it now boots to both the ROM-inator and SCSI, and the keyboard and mouse work perfectly. I am declaring victory on that long, drawn-out saga. And I'm throwing out that flux. Some final steps:
View attachment IMG_0519.jpeg 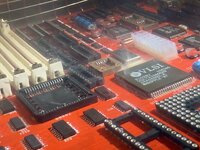 | |||||||||||||||||||||||||
| Posted by: schrockwell on 2025-11-29 17:07:24 This afternoon I completely disassembled the enclosure to get the metal frame out. I sanded down the corroded areas with Scotch-Brite pads and steel wool until they were relatively smooth, then hit it with a couple coats of Krylon Satin Nickel. I swear it looks good as new - maybe even better. Before: View attachment IMG_0529.jpeg After: 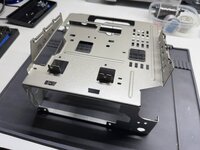 The floppy drive is working well now. Not sure what was up with it, maybe dirty heads. I had already fully serviced and lubricated it a few months ago, and replaced the Omron ejection gear. The Mac reads both the internal and external drive just fine. Time will tell if it stays that way. The original HDD is dead-dead. It powers up but sounds god-awful, and does not read. No surprise there. BlueSCSI is on the way. In the meantime, the Mac has been fully reassembled and promoted to a spot on my desk. I am so unbelievably happy. And it's so fast! Now to cobble together a nice System 7 image from MacPack. View attachment IMG_0540.jpeg | |||||||||||||||||||||||||
| Posted by: schrockwell on 2025-11-30 15:21:37 Well, this has been an adventure. I have learned so much, leveled up my soldering and troubleshooting skills, and spent a godawful amount of time and money (more on that later). But I do have this one-of-a-kind little guy to show for it. In fact, I'm writing this post on the SE/30 right now. Because why not? View attachment IMG_0543.jpeg TakeawaysHere are some personal findings from completing this project. Please learn from my mistakes.1. Patience is key. Do it right the first time. Are you waiting on a certain tool or part to be delivered in order to do something correctly, easier, or in the right order? Don't rush it. Keep waiting. Stick to the plan. Are you frustrated trying to remove, add, or fix a part? Take a break. Come back to it later with fresh eyes. You will make fewer mistakes, and maybe even dream up new solutions by letting your mind rest. This advice also applies to life in general. 2. Every thing that can be done, can be undone. Solder is infinitely reworkable. Think you broke something? Worst case, you spend a little more money and have to wait for a replacement. This is a hobby, and hobbies have costs. 3. Solder from shortest to tallest. Tall, plastic parts will inexplicably attract your soldering iron, releasing toxic fumes and causing unsightly melted marks. Minimize the chance by installing those last. Add components in this order:
The 20-pin PLCC chips (UD12, UE12, UH7) must be socketed. This is non-negotiable. The pads are simply too far underneath the ICs to reliably solder and visibily check connections. Use a socket, which allows you to attack the pads from above. I would also recommend socketing all the DIPs, the processor, UI5, and UI6. The other PLCCs are pretty easy to tackle directly, especially if you have followed #3 and are adding parts in the correct order. 5. Cleanliness is next to godliness. After assembly, I spent an inordinate amount of time chasing ghosts when all the board needed was a nice ultrasonic bath. Maybe the flux was crappy, maybe contaminants snuck in there. Regardless, the solution (ha!) was easy and needed to be done anyway. Make sure you keep the board clean as you work, or clean it up afterwards. Tool MVPsI want to shout out a few tools that unexpectedly became invaluable assets.Hakko FR-301 - Buy once, cry once. While I didn't use it much for the logic bord itself, it made recapping the power supply a breeze. I will get lots of reuse from this in the future. Modified ATX power cable - Dremel-ing off 10 pins from this inexpensive cable yields a power cable extension that allows the logic board to live ouside the Mac chassis for easy debugging while powered up. View attachment IMG_0544.jpeg Headband magnifier - My eyesight is garbage. I need all the light and magnification I can get. This helped. Krylon Metallic Satin Nickel - I can't imagine any better color-match for covering up corrosion on the metal frame. What's left to do?The floppy drive was lubed, the power supply recapped, and display aligned.Next up, the fan will be replaced with a quieter Noctua, and inoperative HDD replaced with an internal BlueSCSI and mounting bracket. What's the damage?Do you really want to know? If you made it this far, maybe.
See, you really didn't want to know. AcknowledgementsThanks to Chris Bolle, to everyone who chimed in on this post with their hints and tips, and to grumpyengineer for lending his ear and ultrasonic bath. He's getting all my spare parts to build his very own Reloaded. No pressure. | |||||||||||||||||||||||||
| Posted by: derFunkenstein on 2025-12-01 12:05:15 Honestly that is less expensive than I expected. I loved reading through your build log. Living vicariously through you as I tinker with much cheaper Macs to get my feet wet in this wild and weird hobby. ETA: I did the Noctua mod in my SE and it was well worth it. The fact it comes with a nice 3-pin to Molex adapter means you don't even have to solder it back to the analog board. | |||||||||||||||||||||||||
| Posted by: slaanesh on 2025-12-01 22:48:38 Thanks for your write up. I'm facing a similar issue - though my board isn't even starting. I socketed every IC that was socketable - all the PLCCs and DIPs. When I read about the flux I looked at mine and I thought it was a bit schmeary so I removed all PLCC ICs and washed the crap out of it with ISO. Not quite a bath but poured it on and scrubbed back and front. But alas there is no change. The problem with mine is that ROMN signal from GLUE isn't being set to OUTPUT ENABLE so the socketed ROMs don't output anything. At least the video area is working as I get a picture (which I can vary 🙂 as I have both VRAM types ) | |||||||||||||||||||||||||
| Posted by: schrockwell on 2025-12-15 15:59:42 A few more minor updates. I replaced the fan with a Noctua NF-A6x25 FLX which I measured to be only 1 dB quieter than the stock fan. I think the fan itself is quieter, but a higher CFM is being forced through the slats in the back, making up for that difference. I also took out the HDD to make room for an internal BlueSCSI. I needed a 16" SCSI cable because the stock one was too short. The rear bracket was printed by a friend in Retro Platinum PLA which is very slick and a great color match. Folks looking for Reloaded boards – they're here! I just received a bulk order of 20 new boards to make it easier, quicker, and cheaper for anyone looking to tackle this themselves. Please see the Trading Post for details. 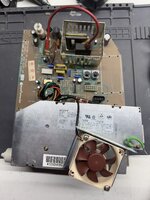 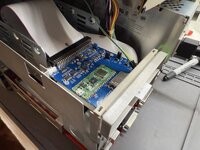 | |||||||||||||||||||||||||
| Posted by: ct_cruncher on 2025-12-15 18:41:43 @schrockwell What BOM did you reference for this? | |||||||||||||||||||||||||
| Posted by: GreenBar0n on 2025-12-15 19:33:49 Congrats on your success with your SE-30! Ordered a Purple board. Thanks! | |||||||||||||||||||||||||
Posted by: schrockwell on 2025-12-15 20:46:57@schrockwell What BOM did you reference for this?I used the BOM file from the GitHub repo with a few adjustments from my PR. Congrats on your success with your SE-30!Great! Thank you! | |||||||||||||||||||||||||
| Posted by: GreenBar0n on 2025-12-16 03:07:46 @schrockwell, regarding the PLCC20 sockets: ebay shows these as $1.80 for (3). How did you end up spending $13 on these - according to your inventory list above - if the shipping is $5.25 and the (3) sockets for UD12, UE12, UH7, are only $1.80? How many of these PLCC20 sockets did you end up needing in total? Thanks! | |||||||||||||||||||||||||
Posted by: schrockwell on 2025-12-16 04:23:55@schrockwell, regarding the PLCC20 sockets: ebay shows these as $1.80 for (3).Fair question. I only ended up needing 3 sockets. So I guess the cost is not totally accurate. I had ordered 4 sets in total: one extra set as a spare in case I messed something up, and then 2 more sets for a local friend who is tackling his own Reloaded so that he has some spares, too. | |||||||||||||||||||||||||
Posted by: schrockwell on 2025-12-16 07:27:57@schrockwell What BOM did you reference for this?Oops, I misunderstood your question earlier. Here are the BOMs. Both are required, and they don't cover everything, but it's a good start. DigiKey (see note below): https://www.digikey.com/en/mylists/list/HGZ2S1DT7P Mouser: https://www.mouser.com/Tools/Project/Details?projectGuid=1c1f8367-9721-4cb6-aef6-1f0960435a95 For the DigiKey order, do not use the PDS connector (120-position) from that BOM. It has press-fit pins which are too big for the holes in the board. Get this one instead: https://www.digikey.com/en/products/detail/te-connectivity-amp-connectors/5535098-5/1091307 For the remaining special parts, I used a combination of these two sheets: 
SE/30 Reloaded BOM Worksheet
SE/30 BOM / Parts list | |||||||||||||||||||||||||
Posted by: GreenBar0n on 2025-12-16 11:17:45Fair question. I only ended up needing 3 sockets. So I guess the cost is not totally accurate.Thanks for clarification. I ordered (2) sets of the PLCC20 sockets just in case something goes wrong. Also appreciate the BOM from Digi and Mouser. | |||||||||||||||||||||||||
| < 4 | |||||||||||||||||||||||||