68kMLA Classic Interface
This is a version of the 68kMLA forums for viewing on your favorite old mac. Visitors on modern platforms may prefer the main site.
| Click here to select a new forum. | |
| Awful Macintosh SE FDHD Revival | |
Posted by: joshc on 2020-05-27 21:35:39For what it's worth, I've never, ever, ever heard even a tiny "pop" when discharging these. ¯\_(ツ)_/¯ But I still do, ever time.As I'm sure you know, the SE's flyback is a later model than that used in the 128K-Plus, and so it has a bleeder resistor inside it which helps take away most of the charge. If one of these has been sat for a while, the likelyhood of any charge being left is unlikely, which is what I tend to do, leave it off for a few days or a week, then discharge it. If I power up my Plus, switch it off, and discharge it straight away - there is still plenty of charge left, as I get a spark/pop noise when I discharge it - and you can actually see the little spark too! (assuming the anode cap is clean) - Give it a go sometime! }🙂 Edit: I know it's already been said, but just make sure you discharge only to the ground lug on the CRT, not the chassis! You can definitely fry things if you discharge to the chassis. Edit 2: Just seen your latest update. It looks great! Glad to see the PSU wasn't severely damaged, though it's easy to find replacement Sony units or build an ATX based replacement. I really like the red capacitor on your analog board, not seen that on a Mac analog board before. | |
Posted by: PotatoFi on 2020-05-27 21:45:56LOL! How the heck did I get misquoted up there? :?:Whoops! I fixed the misquote. And yes, I agree that it's much closer to Lazarus than Wesley. This thing has been dead for a long time! As I'm sure you know, the SE's flyback is a later model than that used in the 128K-Plus, and so it has a bleeder resistor inside it which helps take away most of the charge. If one of these has been sat for a while, the likelyhood of any charge being left is unlikely, which is what I tend to do, leave it off for a few days or a week, then discharge it.I've always let my Macs sit for a few hours before discharging, so I've never experienced this. Not even on my 128k that has a Plus upgrade (although I think it has a bad flyback anyway, still searching for a replacement). Maybe I'll try discharging this one immediately after power-off. For science! | |
| Posted by: Bunsen on 2020-05-29 16:14:37 This is a fantastic worklog / guide so far, and I can't wait to see where it goes. | |
| Posted by: Solvalou on 2020-05-29 19:11:39 That's absolutely insane. I definitely would have given up fore sure. You're an inspiration Potato. 😱 All that hard work and what it looks like now, it might actually, possibly, hopefully, with some wood-touching, power on to maybe something on screen. | |
| Posted by: LaPorta on 2020-05-29 21:08:49 Very nicely done! If even some of the parts work eventually, it’s a win. As for grounding, I rig up the resistor and screwdriver to the grounding wire I have straight to the wall outlet. No chance of frying anything. | |
| Posted by: PotatoFi on 2020-05-30 01:32:27 The Mac sat all night, and then most of the next day while I worked. When work was done, it was finally time for the moment of truth! I plugged it in all by itself with no peripherals, and then flipped the power switch... Nothing. 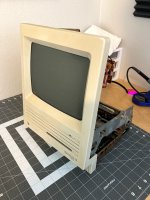 Total silence. No activity whatsoever. Well, I guess expecting this to power on after it had been through was probably a bit too much to ask, huh? But then I got to thinking. Maybe, just maybe. I removed the two screws near the back of the analog board that connect it to the chassis, and then the four screws holding in the power supply. Using a long screwdriver, is pushed in the locking tab on the power supply to analog board connector and popped it out. Then, I was able to twist the PSU sideways and sneak it out of the chassis, since the analog board wasn't connected by those two screws, allowing the chassis to flex a bit. I put a bit of pressure on the CRT when I did this... probably not something I would do all of the time, but I needed to know. 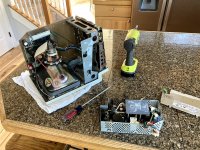 Yep, there's the problem! 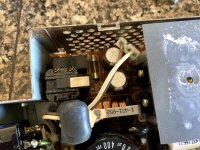 That probably needs to be plugged in for anything to work. I plugged it back in, reassembled, and... 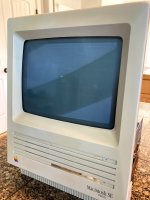 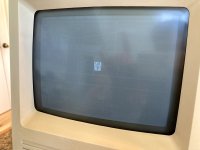 Haha, yes! It works! Next, I grabbed my external drive (which has a 1.44mb SuperDrive installed) and a System 7.0.1 Install 1 disk. I couldn't find my Disk Tools disk, but whatever, I just wanted to see if the floppy controller worked. 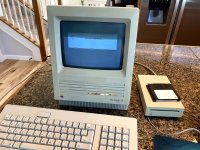 Floppy controller works! I texted my friend who gave me the machine: 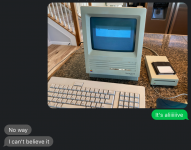 At this point, I've verified that the external floppy port works, and both of the ADB ports work. 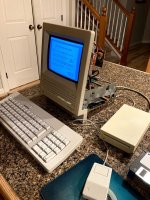 The screen was pretty dim (this picture was taken at night, in the daytime it's a bit hard to see), so I adjusted the max brightness cutoff up as much as I could before lines appear. Looking for some advice here, would an analog board recap help, or is this likely to be a weak CRT? For what it's worth, the analog board caps look fine but I know that doesn't mean much. 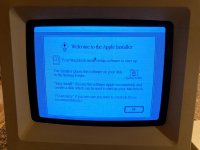 And yes, there is significant burn-in on the screen, but I don't care, I'm just thrilled that it works! Next up: I'll clean up and lubricate the floppy drive. It's pretty rough, but considering how far we've come already, I think it's going to work. There's also the hard drive to test as well. | |
| Posted by: IlikeTech on 2020-05-30 01:41:37 All I have to say is holy crap, what a lot of time and effort! More than I would put in! Kudos! | |
| Posted by: PB145B on 2020-05-30 02:12:23 You can’t kill an SE! Great work. | |
| Posted by: bibilit on 2020-05-30 02:25:23 Congratulations. Hope the hard will work, but won’t bet on that this time. | |
| Posted by: dochilli on 2020-05-30 02:39:33 Nice work! I would have given up with the SE because of the amount of rust. I like to read this thread! | |
| Posted by: dzog on 2020-05-30 02:41:32 This is giving me life today! Awesome work and reporting, and a testament to the SE's resilience. | |
| Posted by: JustG on 2020-05-30 03:07:35 What an amazing transformation! This gives me hope for a couple of SEs that have been sitting around and I've yet to be brave enough to look inside. | |
| Posted by: joshc on 2020-05-30 03:23:06 Nice, nice, nice! Did it chime too, is sound working? | |
| Posted by: Solvalou on 2020-05-30 03:33:45 Wow, just wow. You sir definitely deserve that result after all that hard work. Kudos! Funny when working methodically, there's always something really obvious and stupid that's amiss. | |
| Posted by: techknight on 2020-05-30 03:34:45 That is damn nice work. About the CRT, Yea, its weak. Need to keep an eye out for a replacement somewhere. | |
Posted by: PotatoFi on 2020-05-30 07:03:39What an amazing transformation! This gives me hope for a couple of SEs that have been sitting around and I've yet to be brave enough to look inside.Get those batteries out! Noaw! Nice, nice, nice!No chime, because for my test, the speaker was not installed. Wow, just wow. You sir definitely deserve that result after all that hard work. Kudos!Thanks! Seeing it come to life was very rewarding. That is damn nice work.Thanks techknight! This one just took a bunch of elbow grease, that's all. As for the CRT, I don't think I'll bother. I am looking for a CRT for my Classic II, but for this machine, I won't worry about it. | |
| Posted by: LaPorta on 2020-05-30 07:40:35 Which CRT do you need for the Classic II? The later-style connector? | |
| Posted by: Scott Baret on 2020-05-30 09:33:26 Classic II requires the later one 99% of the time, but I did once see a Classic II with the earlier connector. My guess is that it had been cobbled together out of an older analog board and CRT, probably from a donor Classic I. Every SE uses the older style CRT, which are super common. They're also one of the most reliable parts in the whole machine unless the neck gets snapped while working on them. | |
Posted by: PotatoFi on 2020-05-30 13:15:35Which CRT do you need for the Classic II? The later-style connector?Oooh, let's chat about this. Maybe over in the Classic II restoration thread. Tomorrow is supposed to be sunny and hot, the perfect opportunity for some retrobrite! While I did scrub the case down earlier, I didn't really detail it. There are still some rust stains, black marks, and grimy corners to deal with. I discharged the CRT and disconnected the anode wire, and went to work with the impact driver. And speaking of the impact driver, I've been using it a LOT on this project. I think it will become a main part of how I work on these going forward. It makes teardowns super fast. 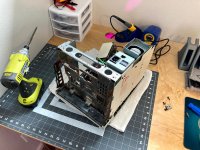 A couple of minutes later, it looked like this: 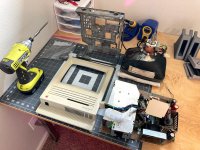 Before retrobrite in the sun, it's important to remove the Apple badge. If not, the heat and direct sun can bleach out the red and yellow colors. To remove it, carefully push something through the hole in the back. Be careful though, something sharp like this needle can poke through the paint in the badge. No trouble here, but just something to watch for. Normally I use a paperclip but the hole was too small.  Next, it was time to remove this stubborn "Property of the State of Idaho" sticker.  I carefully got under it with a razor blade.  Hrm, a couple of new scratches... but worth it, I think. 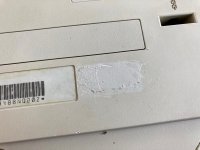 To finish removing the sticker, I attached the residue with some goo-gone. 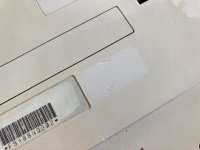 With the sticker all taken care of, it was time to take the case outside for a final cleaning. I used my old standby: Dawn dishwasher detergent and a toothbrush, along with baking soda on a wet paper towel for the stubborn marks, like these. No surface on the Mac was without blemishes like this! 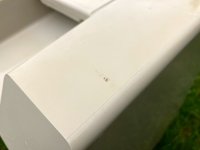 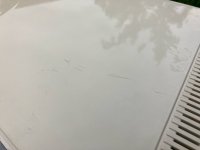 There were some REALLY stubborn parts, like the rust stains all around the bottom of the case. Like I mentioned before, scrubbing with a wet paper towel and baking soda does smooth out the texture a bit, since it's basically a mild abrasive, but it's pretty minimal and worth the tradeoff. Here's just before I took it inside: 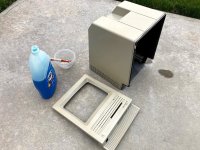 Here's how it turned out. The vents along the bottom had tons and tons and tons of rust stains. 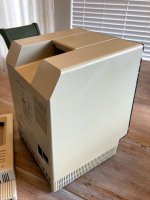 They look pretty good now! Not quite perfect but good. You'll have to look close to find the rust in this photo. 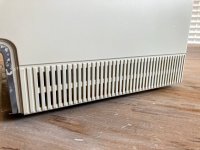 I worked on the inside a bit too. 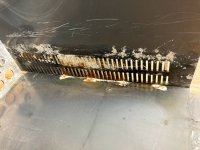 Tomorrow: Retrobrite, maybe getting over to my brother's shop to use his sandblaster, paint, and maybe cleaning up a floppy drive? We'll see. | |
| Posted by: techknight on 2020-05-31 07:47:20 Doesnt matter what the yoke connector is and if its compatible ALL The CRTs are interchangeable between ALL the B&W compact macs. Its just a matter of swapping the yoke between the tubes and retuning any geometry. | |
| < 2 > |