68kMLA Classic Interface
This is a version of the 68kMLA forums for viewing on your favorite old mac. Visitors on modern platforms may prefer the main site.
| Click here to select a new forum. | |
| 3D-Printed Objects | |
Posted by: pb3623 on 2018-03-22 10:09:21I am thinking the same thing. The only two unknowns would be the height and width of the user-facing end of the buttons. It looks like the height might be the same as the stem part, but I couldn't find any really high quality pictures to tell. The width is definitely something we'll want to measure too. I would think the depth would be the same as the Q700 buttons, since the logic board dimensions and mounting relative to the case are (as far as i know..?) exactly the same between the Q700 and the IIci. I can bang out something quick and dirty if you want, but I would much prefer to get at least those two measurements before having anyone potentially waste time printing one. @Swolfington Finally had a chance to take some measurements (I can't find my metric slide rule so I had to go with 1/16s) Looks like each rectangular button is 13/16" (.8125" or 20.6 mm) There is a gap of 2/16" (0.125" or 3.2 mm) So, unless I have fat fingers, that means an outer width (end to end) of 1.75 in (44.45 mm). Eyeballing your drawings, we're in the ballpark. | |
| Posted by: Jon183 on 2018-04-11 18:52:38 Hi everyone, I was thinking about my ibook g3 clamshell and I cant stand the missing logo, both parts of it are missing. How would a 3D printed one look? Even if its orange and not translucent, it might still look ok. I believe translucent orange filament does exist though. | |
| Posted by: markyb86 on 2018-04-12 03:41:58 I think the regular orange wouldn't look so bad actually. Might have to be a little thicker than original but it should work. I found an Apple logo DXF file a while back if you want to use it. View attachment apple.dxf | |
| Posted by: SDUBjed on 2018-04-16 09:28:00 Mac plus battery door, might fit other models: 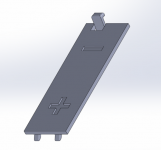 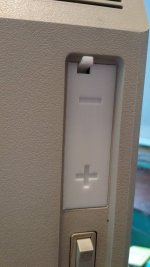 | |
| Posted by: MOS8_030 on 2018-04-16 10:19:05 Very nice. That's one of the first things I would have expected someone to make. | |
| Posted by: 360alaska on 2018-07-08 11:58:38 This really isn't ready but it's 90% perfect! I'm releasing it due to requests: 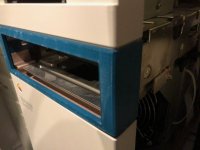 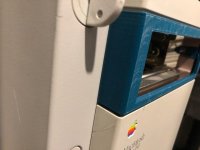 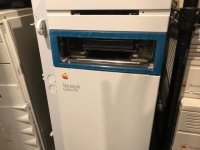 View attachment 950bezel.stl | |
| Posted by: Trash80toHP_Mini on 2018-07-08 12:14:07 Fabulous work, as always, love it. :approve: | |
| Posted by: Swolfington on 2018-07-08 12:17:25 Great work! | |
| Posted by: 360alaska on 2018-07-08 13:45:23 Once we’re 100% on the model we can order a run on a SLA printer so it won’t have any lines and then Home Depot sells a near perfect color matching spray paint! If somebody knows how to cast plastic that would be an option also. | |
| Posted by: Swolfington on 2018-07-08 13:59:12 Can you post what that paint matches that color? I've been contemplating painting some of my parts, but I haven't been able to find a positive lead on paint color/brand/whatever. | |
| Posted by: 360alaska on 2018-07-08 14:01:56 Used this to paint a 14" LCD to match my 700  | |
| Posted by: Swolfington on 2018-07-08 14:07:00 Awesome, thank you! Definitely gonna give that a try when I get the chance. | |
| Posted by: markyb86 on 2018-07-08 15:03:05 Sweet, that's the paint I've been using on my micro scale quadra! | |
| Posted by: EvieSigma on 2018-07-08 15:14:18 Great to see you've pulled this off! Can't wait to see the fully finished model. | |
| Posted by: pb3623 on 2018-07-08 15:58:22 With all due respect to @360alaska, I appreciate the work done on this (that seems to mirror the work that was documented here) - truly, I do - but so we’re on the same page, the bezel I’ve been asking for (which some folks actually have and have been willing to part with temporarily) is the caddy-load bezel that really only has the caddy-length slot and a round eject button. The one you’ve made is the style I currently have that is more of the universal variety; example, I’m using it with a caddy-load 300i. I’m just glad I didn’t get ragged on for bumping an old thread 🙂 | |
| Posted by: 360alaska on 2018-07-08 15:58:54 A caliper and some cad knowledge is all it takes. | |
Posted by: 360alaska on 2018-07-08 16:01:02With all due respect to @360alaska, I appreciate the work done on this (that seems to mirror the work that was documented here) - truly, I do - but so we’re on the same page, the bezel I’ve been asking for (which some folks actually have and have been willing to part with temporarily) is the caddy-load bezel that really only has the caddy-length slot and a round eject button. The one you’ve made is the style I currently have that is more of the universal variety; example, I’m using it with a caddy-load 300i.Nope, I did not use that as a starting point. I did see though and I tried and it was WAY off. I got a syquest bezel off of eBay and mike’d that. It figures that I work hard, make muiltiple prototypes to adjust the length of the clips only to be accused of copying someone else’s untested/defective design. | |
| Posted by: Swolfington on 2018-07-08 17:34:33 @360alaska I don't think pb3623 was implying that you stole the model, just that it was of the same part and not the bespoke (and much rarer) caddy-loader bezel. | |
| Posted by: 360alaska on 2018-07-08 18:40:37 Yeah, I mean if someone wants I can share it in tinkercad, which is what I use, and then they can edit it and turn it into a caddy bezel. It’s not very hard but for me my only two computers with caddy cds are 550 and 660av. | |
| Posted by: pb3623 on 2018-07-09 19:44:01 No, I wasn't implying anything like that - other than if you knew it was there, it could've saved you a bit of work. Turns out you did know it was there and used that as a starting point. The one I uploaded and printed from Shapeways has a slight gap on the right side but I think I used too thin a material (flimsy). But it (measuring, modeling, and creating the STL yourself) is a good skill set to have anyway, as you noted - especially with supply drying up quickly on old parts like this. | |
| < 11 > |