68kMLA Classic Interface
This is a version of the 68kMLA forums for viewing on your favorite old mac. Visitors on modern platforms may prefer the main site.
| Click here to select a new forum. | |
| 3D-Printed Objects | |
| Posted by: Sunoo on 2018-01-28 06:02:36 Has anyone ever found or made a model of the hard drive sled for the Performa 6200 line (and maybe others?). Mine was very brittle plastic and kinda crumbled as I took it out, but it doesn't seem like it would be overly difficult to model. I'd take a crack at it myself, but I don't have any idea where to even begin. | |
| Posted by: Sunoo on 2018-02-03 20:27:32 I worked with a friend of mine to create a model of the hard disk sled that can hold the Aneew SD to IDE adapter (https://www.amazon.com/gp/product/B074RG66ZV/). Unfortunately, the holes got dropped from the final model, but a power drill solved that easily enough. It works really well. View attachment PreformaSled.stl 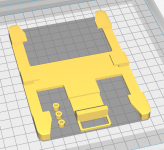 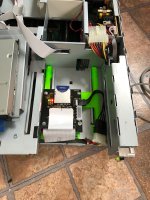 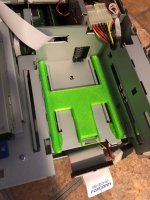 | |
Posted by: ry755 on 2018-02-03 23:00:43I worked with a friend of mine to create a model of the hard disk sledCool! Although mine broke because I accidentally stepped on it. :-/ Do you mind taking a picture and giving me the dimensions of the floppy drive sled? I want to try to model that. My original one got thrown out when the floppy drive broke. | |
Posted by: Sunoo on 2018-02-04 05:15:06Cool! Although mine broke because I accidentally stepped on it. :-/I’d be happy to when I have a minute. Just to make sure we’re talking the same part though, the floppy mount on my machine is metal. If that’s the guy you want. I’ll pop it out probably tomorrow and try to get some measurements. | |
Posted by: ry755 on 2018-02-04 09:15:06I’d be happy to when I have a minute. Just to make sure we’re talking the same part though, the floppy mount on my machine is metal. If that’s the guy you want. I’ll pop it out probably tomorrow and try to get some measurements.Yep, that's the right part. Thanks! I've just been holding the floppy drive in place with cut up CD cases, but it obviously doesn't work so well. :lol:  | |
| Posted by: Trash80toHP_Mini on 2018-02-05 10:23:51 I've got samples of what might be just about every sled and mount up through BG3DT to lend out or sell cheaply as samples for reproduction. No skin in the game here, expect no mercy! Pricing will be at eBay levels if I even suspect you're only angling for goodies from my hoard as replacement parts. 😛 | |
| Posted by: redruM69 on 2018-02-06 19:34:39 Figured I should chime in again. Here's my simple bracket for mounting the "Michael McMaster" 34-50 pin SCCSI adapter, and SCSI2SD v5b neatly into the original HDD tray of the Macintosh Portable. Everything is mounted using standard #6 computer case screws. https://www.thingiverse.com/thing:2775649 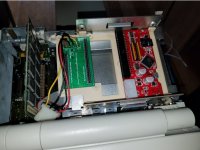 | |
| Posted by: Swolfington on 2018-02-19 20:29:12 Awesome stuff! Coincidentally I was also working on reproducing the q8XX/PM8500/9500 etc (does this style case have a shorthand name??) hard drive sled as well (apple part number 815-0446) 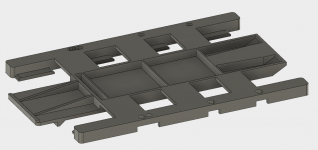 View attachment 815-0446.stl My intention was to create another sled so that I could mount an internal Jaz drive into the middle bay on my 9500, but I ran into a small snag. The sled itself was great, and for a hard drive it would have been fine, but for the Jaz drive, it was mounted too low. Aside from the fact it would be annoying aesthetically, the RF shielding built into the front of the case was actually blocking (and pushing ever so slightly) into the bottom half of the eject button. Not a problem, just design something for the drive to sit on: 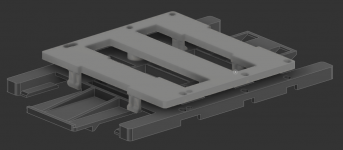 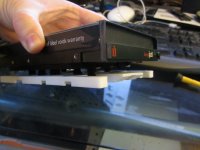 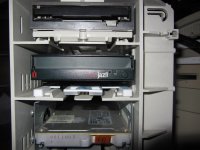 View attachment 815-0446-platform.stl It snaps into place onto the the drive sled and has the exact same mounting holes. Screw the drive to the platform before attaching to the drive sled. Also, it probably fits the original part, but in my enthusiasm I mounted and installed it using my 3d printed part before I thought to try it. My model of the drive sled is very close to the original, but the original has certain design considerations for injection molding that I did not replicate (some of the struts that appear to be at 90 degree angles are actually slightly off 90 in some places, I presume to make ejecting from the mold easier) . I don't imagine that will have much impact, but there you go just in case. I should also note that the boost platform thing was designed entirely by me, so the likelihood of it actually positioning the drive to fit any existing apple made bezel is probably not so good. It should put the drive just about dead center for the bezel space..so it might, but I don't have any measurements (let alone an actual bezel) to test against. Feeling otherwise pretty good about how everything was coming together, I designed a bezel for the Jaz drive as well: 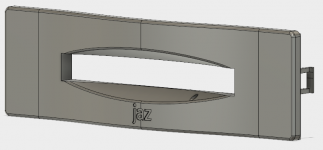 View attachment 815 jaz bezel.stl I should also note, again, that I have not actually printed this part out, so i'm not 100% sure that it will A: Fit and B: actually work as intended. I am pretty sure the Jaz cartridges will clear the bezel in such a way that you can grab them when they are ejected, and I am feeling pretty alright about the actual bezel lining up with the drive correctly. However, Unless you don't mind wasting your time/effort/plastic, I would suggest not printing this out until I work out all the potential bugs. But who knows! Maybe I got it right on the first shot. The reason I haven't printed is largely due to my printer having some kind of clog in the nozzle, resulting in under-extrusion which makes for terrible 3d printing. I'm going to have to take the extruder apart and the nozzle off to fix it and i'm just putting it off because i don't want to burn myself. How I think (read: hope) it should line up: 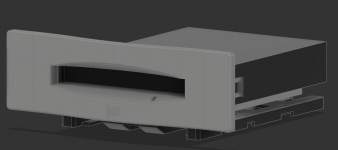 It was also about this point in time when I decided that it would be a smart move to actually plug in the Jaz drive to see if it, you know, worked. I bought the drive a couple months or so ago at a second hand store for 2 or 3 bucks, and it looked like it was in decent shape... but looking good is about all it does 🙁 . Not a huge loss honestly, it was just a good excuse to build all this stuff, but it would have been nice to have. Plus it's a good base to build a Zip based bezel which is I'm sure is of far more utility to most everyone else (I have an ATAPI zip drive, which is fine for using to measure stuff, but I have no appropriate Macs from which to drive it) | |
| Posted by: MinerAl on 2018-02-20 06:20:39 The school I work at has purchased a 3D printer that has a 10"w x 10"d x20"h (254mm x 254mm x 508mm) print area. That's big enough to print a compact Mac bezel (diagonally at least). 128k, 512kx, Plus, SE/x, Classic, and even the Color Classic should all be do-able. Immediate applications that come to mind - customized floppy openings for different media (Zip/Jaz drives, optical drives, Twiggy drives, SD cards), customized monitor openings and interior mounting lugs for for flat screens, simple replacement of broken bezels, Macquaria and Macsks, even whole new esthetic takes on the front of a compact Mac (like this. ) I don't think buckets are possible yet, but it might be fun to do a 5/9 scale one with a little 5" CRT or 4:3 flat screen. Anybody got a good scan of the face (interior and exterior) of any compact Mac? I'd really like a Classic model to mess with, but any compact Mac face will do. | |
Posted by: Unknown_K on 2018-02-20 20:22:18How about parts for the 630 machines that actually stay on?Does Elmers glue actually hold plastic together? I guess they didn't have a hot glue gun handy. | |
| Posted by: Trash80toHP_Mini on 2018-03-01 11:21:38 Skip to the bottom paragraph for the part to be printed: Rats, not in the exploded view, I'll have to post pics of the cover plate. View attachment 21844 But it shows the RJ-11 hole where the MicroSD chiplet falls through. :🙂 edit: just about any RJ-11 MicroSD Dumpster Lid might be a good candidate for a 3D Printmaking Project. Definitely need one for the PowerBook 100, sure don't need that modem in there these days. | |
| Posted by: Swolfington on 2018-03-13 16:07:31 Got my printer up and running again! Yay! The other day (before I had fixed my printer), I thought I read a post on the forums where someone was looking for a Quadra 700 style reset/interrupt switch. I figured it would be fun to try, and I have the part, so it would be kinda cool to make something that someone else actually needs. Turns out, he was looking for a IIci switch, which is similar, but different. But before I realized that, I already made the thing: 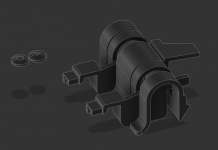 and printed it out: 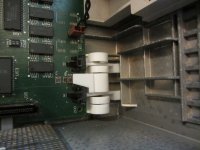 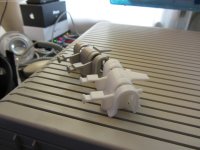 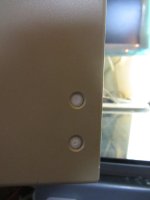 STL files here: View attachment 815-6270 rev 5.stl View attachment ResetSwitch.stl View attachment Inturrupt switch.stl I Oriented the models like this for printing 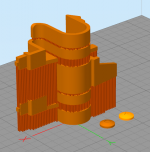 The darker orange bars are support material. Depending on your printer you may or may not need to be quite so liberal with the supports, but my settings in Simplify3d were 1mm supports for the whole thing. I think I had more support material going into it than the actual part itself. If you were to print it as it sits in real life you might be able to get away with fewer supports, but then you would have the layering working against you and since the entire body is kind of one big spring, I figured it would be best to have it printed sideways. The buttons have a little square indentation on the under side that is supposed to mate with the little square protrusion on the tips of the button stalks, with your superglue of choice adhering them toether..which kinda sorta worked for me. Due to the imprecise nature of printing such small parts i had to file some stuff down here and there to make it all fit, but overall it worked well. There shouldn't be a lot of stress on the button that would cause the glue to break over time so it shouldn't need to be perfect. | |
| Posted by: pb3623 on 2018-03-13 17:56:51 That’s great work. It was my post you were referring to and yea, it was a IIci (I have a 700 as well, but I have the switch). If if I can swag some measurements based on photos or at least my IIci’s case openings, care to hazard a guess on a IIci switch? The “spring” mechanism appears to be identical; it’s the button itself that is different based on the openings. | |
| Posted by: Swolfington on 2018-03-13 18:52:49 I was actually going to PM you asking exactly that! (I meant to do it right after I made that post, but I had to unexpectedly had to go for a little bit) I'll try to source some pictures, and if you can give me the measurements of the holes in the case, that should be enough, assuming everything else is the same. Definitely worth a try! | |
| Posted by: pb3623 on 2018-03-14 10:52:34 I'll take some measurements when I get home - but it almost looks like you could take off the buttons (round caps) and it would work? I would start with that assumption and tweak the "stems" before you start redesigning the entire piece. Just take off the round cap. | |
| Posted by: Swolfington on 2018-03-18 16:55:52 I am thinking the same thing. The only two unknowns would be the height and width of the user-facing end of the buttons. It looks like the height might be the same as the stem part, but I couldn't find any really high quality pictures to tell. The width is definitely something we'll want to measure too. I would think the depth would be the same as the Q700 buttons, since the logic board dimensions and mounting relative to the case are (as far as i know..?) exactly the same between the Q700 and the IIci. I can bang out something quick and dirty if you want, but I would much prefer to get at least those two measurements before having anyone potentially waste time printing one. In other increasingly esoteric news, I printed up my Jaz bezel for the 8XX/85XX/95XX case, and much to my surprise it actually fit up almost exactly to the drive. the interior lips that mate up to the drive itself were ever so slightly extruded too far out, so the drive pushes on the bezel when the case is fully closed, but that doesn't seem to affect performance. I've updated the model to shave off 1mm from that feature so it should be just now. I also added a fillet to the side walls of the slot to better match the aesthetics of the apple-designed drive bezels: 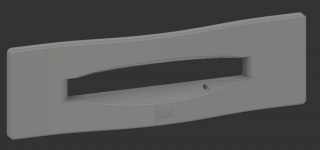 I didn't print out the new version, so it doesn't have the fancy pants fillets on the sides: 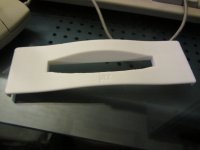 Here it is before (with jaz drive mounted on my custom made mounting bracket thing that attaches to a standard hard drive sled)  and here it is after:  Here it is in action:  I mentioned before that the drive itself wasn't working... It turns out that it is working pretty well, I just didn't know what the hell I was doing with the SCSI ID settings on it (and the other drives in the system). Got that sorted out, and it started working! It does take a suspiciously long time to mount a drive once it's been inserted (hence the jump cut in that gif), like a minute+. It is pretty consistent with its slowness though, so that gives me some comfort. Either way, I'm pretty pleased with how it all turned out! For anyone playing at home, here is the new and improved .stl file: View attachment 815 jaz bezel 1.1.stl | |
| Posted by: markyb86 on 2018-03-18 18:38:08 That jaz bezel turned out pretty good! | |
| Posted by: Trash80toHP_Mini on 2018-03-18 21:07:38 Very, very nice! Can't wait to see your Zip Bezel. BTW, when I posted the bottom plate of the luggable to show the modem port, I forgot to (again?) suggest that someone model the Luggable's locking tab/button/lever assembly: 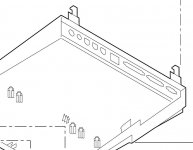 I'm missing two, luckily they're evenly divided between a pair of cases for now, but I'm sure a lot of folks would appreciate a printable replacement part. | |
| Posted by: joethezombie on 2018-03-20 18:14:16 Macintosh II Vertical Stands I recently acquired thanks to a very generous forum member. Note: These are made of aluminum. I'm not sure a plastic or vinyl print would be up to the task of holding a fully loaded Mac II. Also, these are untested. I scanned them, and made sure the scaling is proper, so i'm 99% sure they're the right size. But with the library printer out of commission (which availed free printing for me), I'm not going to pay to have some done for testing. Printer be ware! (ps, you'll need two of them) 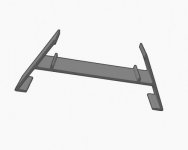 View attachment Macintosh II Stands.stl | |
| Posted by: Swolfington on 2018-03-20 18:19:27 @joethezombie Awesome, Thank you! If it were made of plastic, I would definitely add some ribs (or at least something to distribute the load) to the underside of the main support, and probably beef up the feet. I would not trust that as a plastic part to hold up something as heavy as a MacII, 3d printed or otherwise. | |
| < 10 > |