68kMLA Classic Interface
This is a version of the 68kMLA forums for viewing on your favorite old mac. Visitors on modern platforms may prefer the main site.
| Click here to select a new forum. | |
| One more SE/30 saved ! But strange HDD behavior | |
| Posted by: Ozymandias on 2015-05-18 20:47:42 Hello, I'm new to the forum and Macintosh. I recently bought a non working SE/30 on eBay that came with a nice surprise in the form of a (hopefully working) network card. -Turned it ON... Nothing (nice Simasi pattern) -Opened it, all capacitors had leaked. -Recapped the board, first time I soldered since middle school. 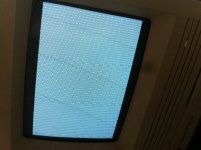 -Still Nothing... but as C9 pads and nearby traces were destroyed by corrosion it wasn't surprising. Using the schematics I slowly checked all traces around the SCSI chip and found 3 disabled (D28, D29, D30) between UJ11, UI12 and UG12. -I soldered wires between the chips pads, it wasn't easy nor aesthetic but it worked: 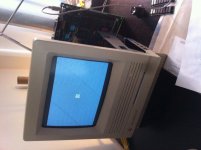 -Still the image was only half displayed so I checked the traces between the video chips and surprisingly found that it was the problem described by genie_mac. https://68kmla.org/forums/index.php?/topic/19821-mac-newbie-se30-vid-probnot-another-one/?hl=se30 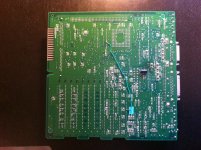 Now I'm the proud owner of an almost working SE/30. Sadly the system boot up on the HDD only when half of the RAM is removed. Also the Disk is not seen by Apple HD Setup but Disk First Aid was able to perform a test on it and found errors. Now I'm in need of your expertise. What do you think, is the RAM, the HDD, the SCSI chip or something else the cause of this behavior ? | |
| Posted by: 360alaska on 2015-05-19 12:40:01 With symptoms like that how is voltage? | |
| Posted by: Ozymandias on 2015-05-19 14:07:34 ATX connector measured voltages are -4.98V (6), -10.47V (7), +5.28V (12,13), +12.62V (14) Molex disk connector voltages are 12.71V and 5.08V 😉 | |
| Posted by: 360alaska on 2015-05-19 14:16:29 so -12 is too low and +12 is two high, and what are they without the ram? | |
| Posted by: Ozymandias on 2015-05-19 14:58:13 The voltages above were the ones coming from the pwr supply. With the RAM they are -5V (6), -11.77V (7), +5.04V (12,13), +12.71V (14) Molex are 12.33V and 5.05V RAM was maybe just a coincidence because today it wont boot on the HDD no matter what. | |
| Posted by: techknight on 2015-05-19 15:48:32 Time to check traces between the SCSI IC and the SCSI header. They break at the IC. | |
| Posted by: Ozymandias on 2015-05-19 19:26:38 I checked all traces going to/coming from the SCSI IC, they are fine. | |
| Posted by: techknight on 2015-05-19 20:00:08 You try another known good working drive? I would hope so. Otherwise, did you check the DMA lines that bounce between the SCSI IC, GLU, and VIA? | |
| Posted by: Ozymandias on 2015-06-02 14:25:11 I'm Back. I tried with two different drives, but as they are old I cannot trust them. So I bought a new one from maccaps.com thus the delay in my answer. Same problem with the new disk, the disk starts, make some noise first but quickly does a ticking noise (one tock every 3 sec) but nothing else happen and the computer does not boot on it ( :?: screen) Again the Disk is not seen by Apple HD Setup. I also checked all the connections of the UI12 chip. | |
| Posted by: uniserver on 2015-06-02 15:02:36 can you show us a picture of the scsi chip on your main board? | |
| Posted by: uniserver on 2015-06-02 15:06:45 one time. lol out of all the SE/30 boards i have recapped, was the actual scsi chip bad. but it was the same situation, the pad's metered out good... i flowed on a new scsi chip and it worked! | |
| Posted by: Ozymandias on 2015-06-02 15:22:41 Sure 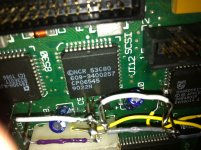 I apologize for the unorthodox soldering as I realized only afterwards that I should have used smaller wires. But everything is connected. 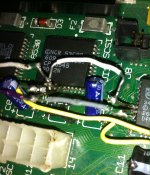 | |
| Posted by: falen5 on 2015-06-02 15:39:50 WoW...that's one original soldering technique there! - ive done a bit of heavy jumping on boards, but I rekon you should take off all what you have done, clean the board a few times, and re start with much smaller wire. Its worth the wait to get some fine wire to work with. Your solder connections are very rough! - there are so many uncovered wires its just an accident waiting to happen. - best of luck with it | |
| Posted by: techknight on 2015-06-02 15:50:36 Oh dear gosh..... | |
| Posted by: Elfen on 2015-06-02 17:56:21 Some times, you just got to say "Phucket! It works!" Now that you got it working, you can go back when you are up to it and replace the thick wires with thinner ones. | |
Posted by: Ozymandias on 2015-06-03 13:47:44Oh dear gosh.....lol Removed the chip with Chip Quik and used 30 AWG wires. Just have to wait for a new IC now. 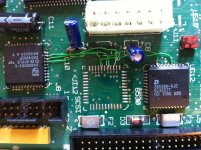 | |
| Posted by: uniserver on 2015-06-03 15:57:54 good job man! 😀 | |
| Posted by: falen5 on 2015-06-03 17:20:49 now your taking ozyman - good clean job - - onwards! | |
| Posted by: Elfen on 2015-06-03 20:10:26 This is great work! A much major improvement! Why was the scsi chip removed? There is a fuse (F2 and F3 right there!) that sometimes blows and makes your SCSI bus look dead. Check the fuses with a multimeter. | |
| 1 > |